
Debian 13
Debian 13 "Trixie" is the base this whole guide sits on. It's a plain, boring, stable Linux, and for a homelab that's exactly the point: package versions stay frozen for the life of the release, security patches keep coming for about five years counting LTS, so the machine keeps running for years instead of needing a rebuild every few months.
The other reason is that it stays out of your way. Appliance systems like Unraid, TrueNAS or Synology's DSM put their own layer on top of Linux, and the day you need something their interface doesn't expose, you're stuck working around it. Debian is just a server: you install what you want, where you want, and nothing is hidden behind someone else's UI. It also happens to be what most self-hosted projects target first, so their docs hand you apt commands that work as-is, Docker publishes an official Debian repository, and any error message you paste into a search engine already has years of answers behind it. A minimal install is light enough to leave nearly all the RAM and CPU of a small N100 box to your containers.
Installation
cd, listing with ls, editing a file with nano, and reading what a command tells you when it fails. If any of that is new, start with the command line basics and come back.BIOS setup
Press Del or F2 right after powering on to open the firmware setup (the boot screen usually says which key it is). Most machines also have a one-shot boot menu, often F12, F11 or F8, which lets you boot the USB installer once without touching the permanent boot order. Debian documents the general procedure in its installation manual, and here is what matters before you install:
- Boot mode. Prefer native UEFI. The important part is that the installer boots in the same mode you intend to run the server in, because UEFI uses GPT partitioning while legacy BIOS (and UEFI in CSM mode) uses a DOS partition table, and a mismatch installs the bootloader in the wrong place. Watch out on multi-boot machines: the default boot mode for removable devices is often not the one used for internal disks.
- Secure Boot can stay enabled. Debian ships a Microsoft-signed shim bootloader, so it boots fine as-is.
- SATA mode should be
AHCI, notRAID/ Intel RST, otherwise Linux may not see your drives at all. Changing this after installing another OS on the same disk will stop that OS from booting, so set it before you start. - Restore on AC power loss so the server comes back by itself after an outage instead of waiting for someone to press the button. The setting lives in Power Management, APM Configuration or Advanced depending on the board, under a name like Restore on AC Power Loss, AC Power Recovery, After Power Failure, AC Back Function or S0 state. Set it to Power On, not Last State, which would leave the machine off if the outage caught it during a shutdown.
- Wake on LAN, if you want to power the machine up remotely instead of walking to it. Same Power Management menu: set Wake on LAN, Power On By PCI-E/PCI or Resume by PCI-E Device to Enabled, then disable ErP / EuP Ready and Deep Sleep / Deep Sx, which cut power to the network card once the machine is off and would keep it deaf to the magic packet. Debian also needs the card told to listen, see Going further.
- Virtualization (
VT-x/AMD-V, plusVT-dfor passthrough) costs nothing to turn on now and saves a trip back into the BIOS the day you want to run a VM. Docker itself doesn't need it on Linux.
Download the ISO and write it to a USB stick
Download the netinst image
Grab the amd64 netinst image from debian.org. It's around 700 MB and pulls the rest of the packages from the network during install, which is what you want on a server that's plugged into ethernet: you get current packages instead of installing from a months-old snapshot and patching afterwards. The full DVD images only make sense if the machine has no network during setup.
Write it with Rufus
On Windows, write it with Rufus (portable, no install needed). Plug in a USB stick of 2 GB or more, keeping in mind it will be wiped entirely, then:
- Device: your USB stick. Check the capacity twice, Rufus happily writes to the wrong drive if you let it.
- Boot selection:
SELECT, then pick the Debian ISO you just downloaded. - Partition scheme: this has to match the boot mode you set in the BIOS above.
GPTfor UEFI,MBRonly if you're staying on legacy/CSM. The target system field follows automatically. - Leave the format options at their defaults, then hit
START. If Rufus asks how to write the image, keep the recommended ISO Image mode.
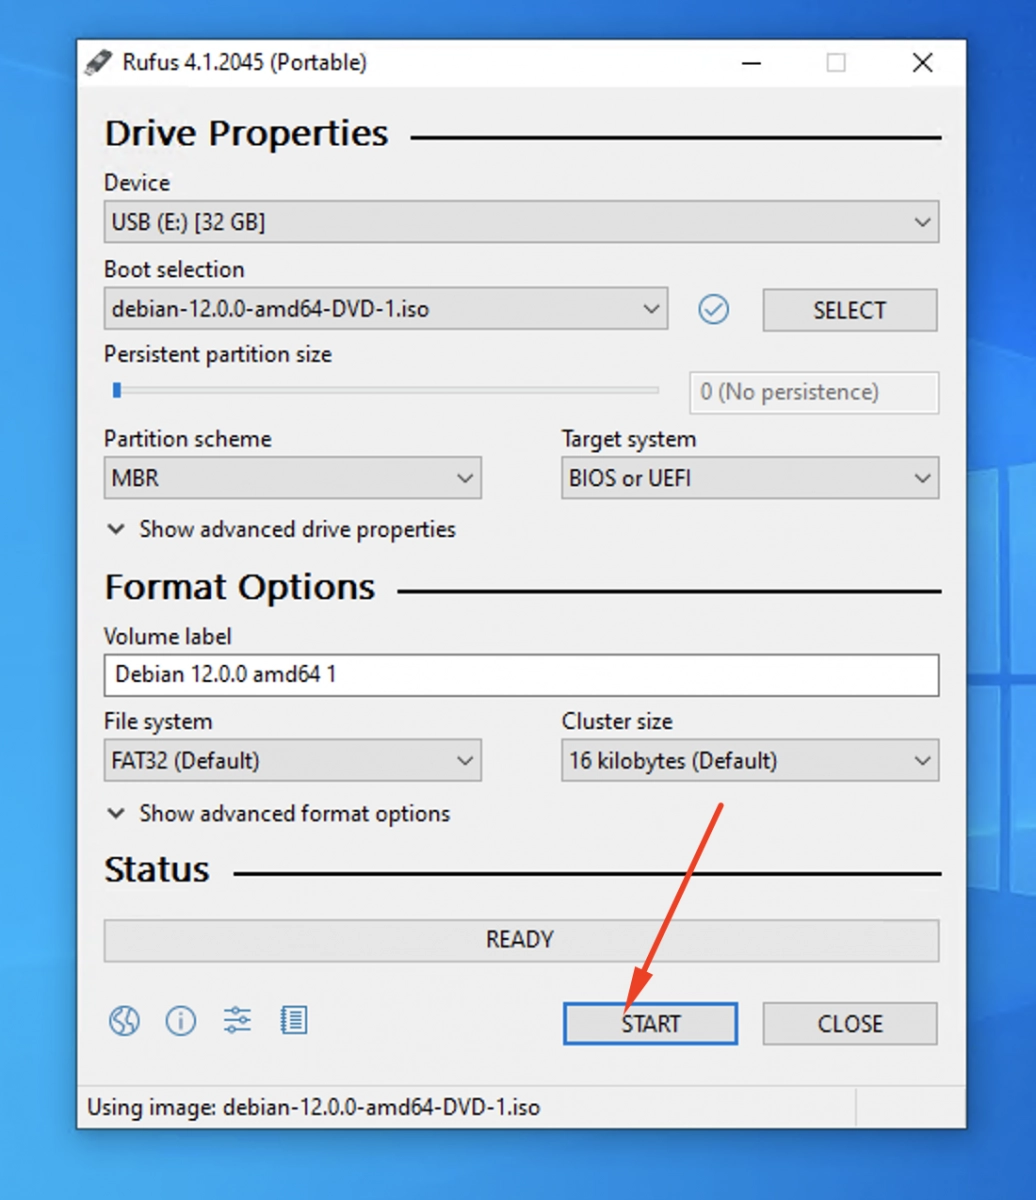
Screenshot from this bootable USB guide on DEV Community.
Writing takes a few minutes.
Done!
Install Debian
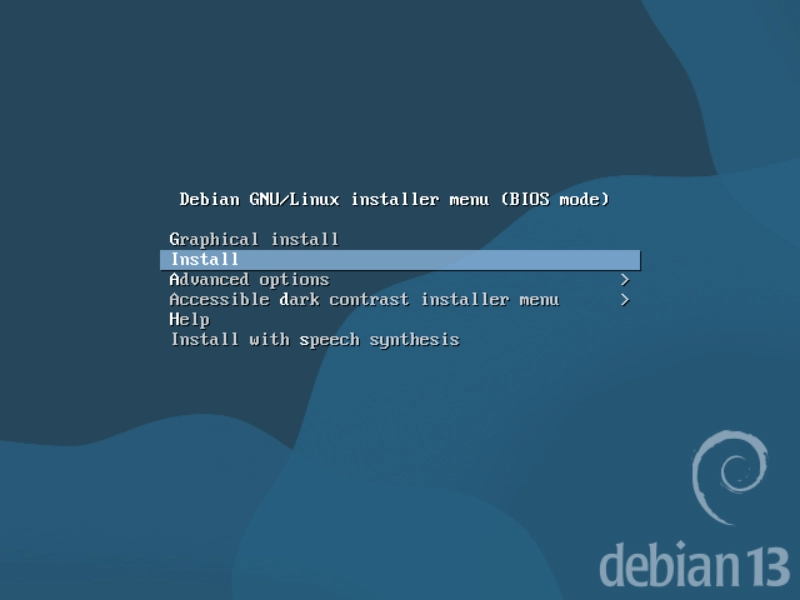
Boot the USB stick (one-shot boot menu from the BIOS section) and pick Install, the text installer. The goal here is a minimal headless server: no desktop, no graphical session, nothing but a shell reachable over SSH. The screen and keyboard you're using right now are only needed for this one install, after that the machine runs blind in a corner. The official installation guide documents every screen.
Language, country, keyboard
Nothing special. The keyboard layout is the one you're physically typing on, which is easy to get wrong if you picked English but type on AZERTY.
Network and hostname
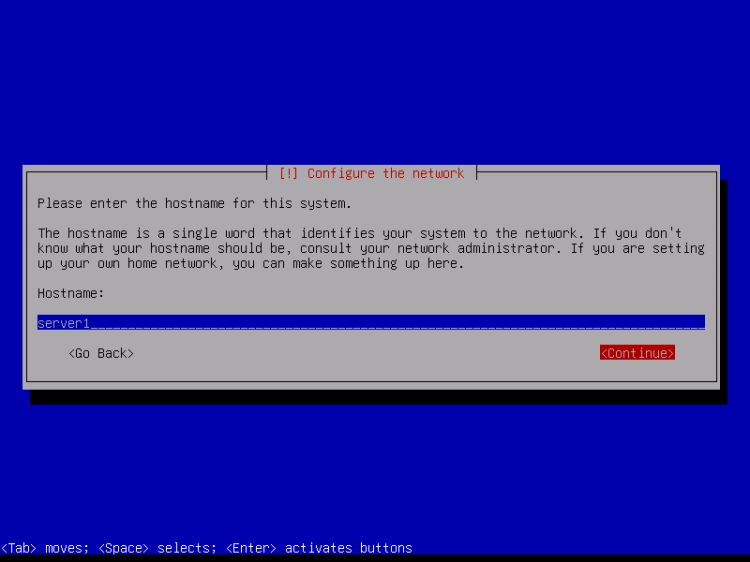
A wired connection gets configured over DHCP by itself. When it asks for a hostname, give the machine a real name (serveex, nas...), you'll see it in every SSH prompt afterwards. The domain can be left empty, or set to something like lan if you already use one at home.
Root password and user account
Leave the root password empty. Debian then disables the root account, installs sudo and puts your user in it, which is the safer default and saves you a round of setup later.
Then create your user: full name, username, password. This is the account you'll SSH into. Avoid admin as a username, it's reserved on Debian and the installer will reject it.
Clock
Confirm the timezone guessed from your country.
Partitioning
Guided, use entire disk on the system drive, then All files in one partition, which gives you one big / plus a swap partition. Separate /home or /var partitions buy you very little here and mostly guarantee that one fills up while the others sit half empty. Pick LVM only if you already know you want snapshots or to grow volumes later. Your data disks are not touched at this stage, you'll mount them afterwards.
Finish with Finish partitioning and write changes to disk, then confirm with Yes: this is the point of no return for that disk.
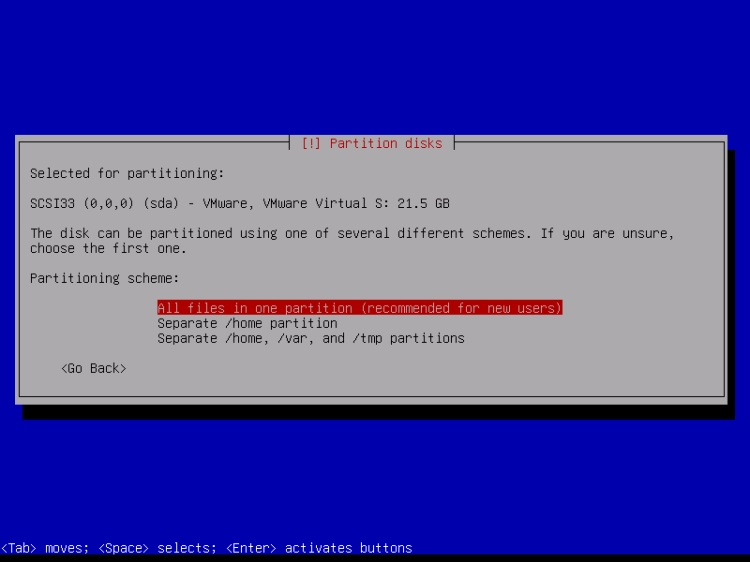
/srv/docker is where this guide puts every stack, is covered in folders and partitions.Mirror and surveys
Answer No to Scan another installation medium?, everything else comes from the network. For the mirror, pick any one in your country, or deb.debian.org which routes to a nearby one automatically, and leave the HTTP proxy field empty unless you actually have one. The popularity contest (anonymous package statistics) is yes or no, no consequence either way.
Software selection (tasksel)
The screen that actually decides whether your server stays minimal. Uncheck everything, in particular Debian desktop environment and GNOME, which are ticked by default and would drag in gigabytes of packages plus a graphical session you will never display. Keep exactly two boxes: SSH server, your only way in from now on, and standard system utilities, which the rest of this guide assumes.
Continue once the two boxes above are the only ones checked.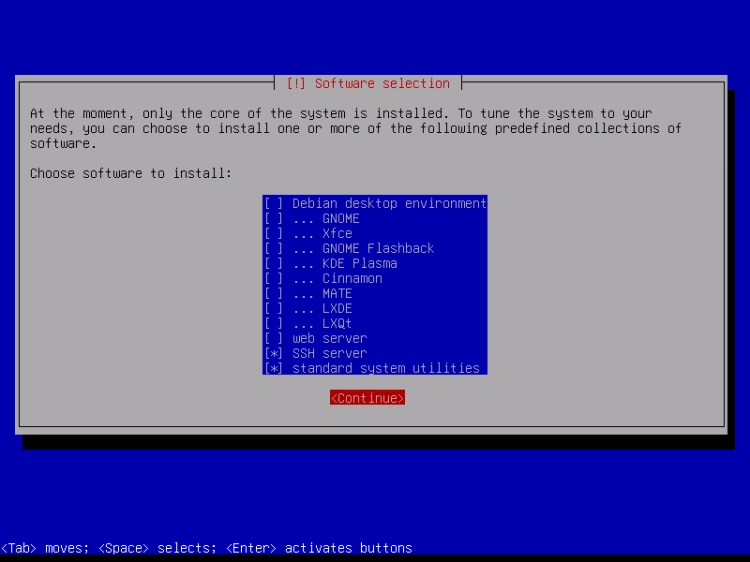
GRUB
Install it on the disk you just partitioned (/dev/sda, /dev/nvme0n1...), not on a partition.
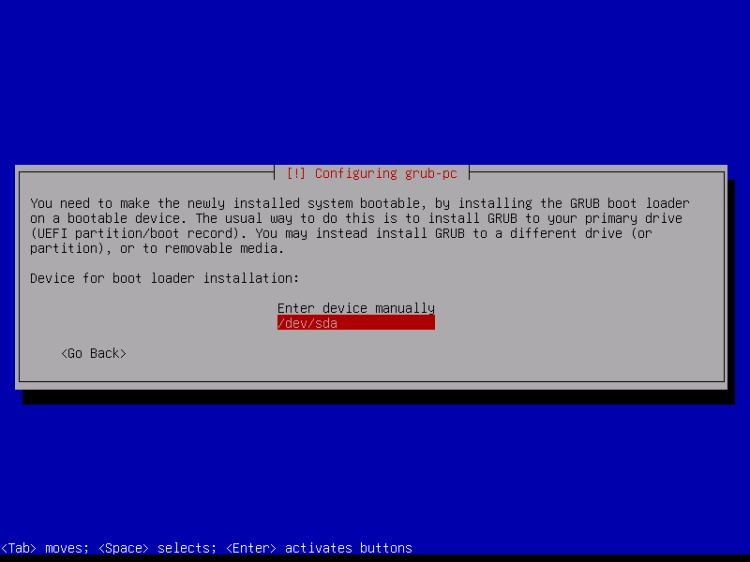
Done!
Installer screenshots from howtoforge.com's Debian minimal server guide.
Connect over SSH
The server has no screen from now on, everything goes through SSH. These steps get you in, then make sure nobody else can be.
Connect from another machine
Remove the USB stick and reboot. The address to use is the one you reserved in the router just before, 192.168.1.42 in the examples below.
Everything from here happens from another machine on your local network, not on the server. Windows and macOS both ship an SSH client, so there's nothing to install: open PowerShell on Windows, or Terminal on macOS, and type the same command.
ssh [email protected]
The first connection asks you to confirm the server's fingerprint, which is normal, answer yes. It gets stored in ~/.ssh/known_hosts and you won't be asked again.
SSH server box was probably left unchecked at the tasksel screen. Plug a screen back in, log in locally and run sudo apt install openssh-server.The screen and keyboard are no longer needed. Unplug them, the machine can go live in its corner.
Log in with a key instead of a password
Passwords over SSH get brute-forced the moment the port is reachable from outside, and typing one on every connection gets old fast. Still on the other machine, generate a key if you don't already have one:
ssh-keygen -t ed25519
Press Enter to accept the default path, and set a passphrase (it protects the key file itself, your system will remember it after the first unlock). Then copy the public half to the server. Windows has no ssh-copy-id, so it pushes the key over the connection instead:
ssh-copy-id [email protected]
type $env:USERPROFILE\.ssh\id_ed25519.pub | ssh [email protected] "mkdir -p ~/.ssh && chmod 700 ~/.ssh && cat >> ~/.ssh/authorized_keys && chmod 600 ~/.ssh/authorized_keys"
ssh-copy-id [email protected]
It asks for your password one final time. Reconnect to check that it no longer does:
ssh [email protected]
Close the door behind you
Once the key works, turn off password logins and direct root access. On the server:
sudo nano /etc/ssh/sshd_config.d/hardening.conf
PasswordAuthentication no
PermitRootLogin no
KbdInteractiveAuthentication no
A file in sshd_config.d/ is read on top of the main config, so your changes survive a package upgrade rewriting /etc/ssh/sshd_config. Apply it:
sudo systemctl restart ssh
PasswordAuthentication yes back in hardening.conf, restart SSH, run the two key steps above from that machine, then set it to no again and restart SSH one last time.Done!
Wake the server up remotely
A machine that runs 24/7 for two hours of actual use burns power, spins fans and wears drives for nothing. Wake on LAN lets you shut it down properly when you're done and bring it back in a few seconds without walking to it: the network card stays powered in standby, listening for one specific broadcast (the magic packet) carrying the server's MAC address, and switches the machine on when it sees it. Handy for a backup target you only need at night, or a media server nobody watches during the day.
Two conditions before you start: the machine has to be wired to ethernet, WiFi cards almost never support this, and the packet has to be sent from the same local network, since a broadcast doesn't cross a router, unless you use a dedicated app and port-forwarding rules on your router. The BIOS side was covered in BIOS setup, here is the Debian side.
Find the interface and its MAC address
ip -br link
You get something like enp1s0 UP aa:bb:cc:dd:ee:ff. Keep both: the interface name for the commands below, the MAC address for the machine that will send the packet.
Check the card supports it
sudo apt install ethtool
sudo ethtool enp1s0 | grep -i wake
The answer looks like Supports Wake-on: pumbg then Wake-on: d. The letter that matters is g, for magic packet. If the Supports line doesn't have it, the card can't do it and there's nothing to configure. Wake-on: d simply means disabled, which the next step fixes.
Turn it on
sudo ethtool -s enp1s0 wol g
Run the check again, Wake-on should now be g. This setting is reset at every boot, so it needs to be reapplied automatically.
Make it survive reboots
sudo nano /etc/systemd/system/wol.service
[Unit]
Description=Enable Wake on LAN
After=network.target

[Service]
Type=oneshot
ExecStart=/usr/sbin/ethtool -s enp1s0 wol g

[Install]
WantedBy=basic.target
sudo systemctl daemon-reload
sudo systemctl enable --now wol.service
Wake it up
Shut the server down with sudo poweroff, then send the magic packet from another machine on the network. On macOS and Linux, the wakeonlan package does it in one command:
wakeonlan aa:bb:cc:dd:ee:ff
Windows has no built-in sender, so the simplest route there is a phone app: any of the free Wake on LAN apps takes the MAC address and works the same way. The server should start within a couple of seconds.
Done!
UDP 9 from the outside to 192.168.1.42:9 on the inside. The router still has to point that IP at the right MAC address while the machine is off, which is why some of them expose a static ARP entry, or a Wake on LAN button of their own that saves you the port forward entirely. Worth checking your router first.Keep it up to date
Debian doesn't update itself. Every month or so, or whenever you think about it, four commands over SSH:
Refresh the package lists
sudo apt update
Nothing is installed at this point, apt only asks the mirrors what's available and tells you how many packages are behind.
Apply the updates
sudo apt full-upgrade
full-upgrade is preferred over plain upgrade because it accepts removing a package when that's what it takes to move another one forward, which does happen on a server that lives for years. Read the summary before answering yes, it lists exactly what gets removed.
Clean up behind them
sudo apt autoremove --purge
Every kernel update leaves the previous one installed, and they pile up if nobody clears them out. Do this every single time, not once in a while. --purge also drops the config files of the packages being removed.
Reboot if the kernel moved
sudo reboot
A kernel or libc update only takes effect after a restart. Everything else applies immediately, so this is only needed when the upgrade touched one of those, and it's worth planning for a moment when nothing depends on the machine.
Done!
&& stopping the chain as soon as one of them fails:sudo apt update && sudo apt full-upgrade -y && sudo apt autoremove --purge -y
-y answers yes to every question, including the day an upgrade proposes to remove something you would rather have kept, so keep it for routine rounds. Append && sudo reboot to get the restart out of the way too.For security patches without having to think about it, sudo apt install unattended-upgrades then sudo dpkg-reconfigure -plow unattended-upgrades applies them on its own every night. Note that all of this only covers the system: your containers are updated separately, from Dockge.