
Handy CLI tools
A minimal Debian install ships with the strict minimum, which means the tools you get are the ones from 1995. They work, but reading df output or hunting for what filled a disk with du is needlessly painful when better versions exist and cost nothing to install.
Everything below except the last one comes straight from Debian's repositories, so there's no third-party source to trust and apt keeps them updated along with the rest of the system.
sudo, apt and cd don't mean much yet, start with the command line basics.The short version
| Tool | Replaces | What for |
|---|---|---|
btop | top, htop | Watching CPU, RAM and processes |
duf | df -h | Free space, readable |
ncdu | du -sh | Finding what filled the disk |
tldr | man | The five commands you actually need |
lazydocker | docker ps and friends | Managing containers over SSH |
ufw | raw iptables | A firewall you can actually read |
The impatient version
One line installs all the packaged ones, and each section below explains what you just got.
sudo apt update
sudo apt install btop duf ncdu tealdeer ufw
btop, watching what the machine is doing
The modern replacement for top and htop: CPU, RAM, disks, network and processes on one screen, with graphs, colors and a working mouse. This is what you open when something feels slow.
Install it
sudo apt install btop
Run it
sudo btop
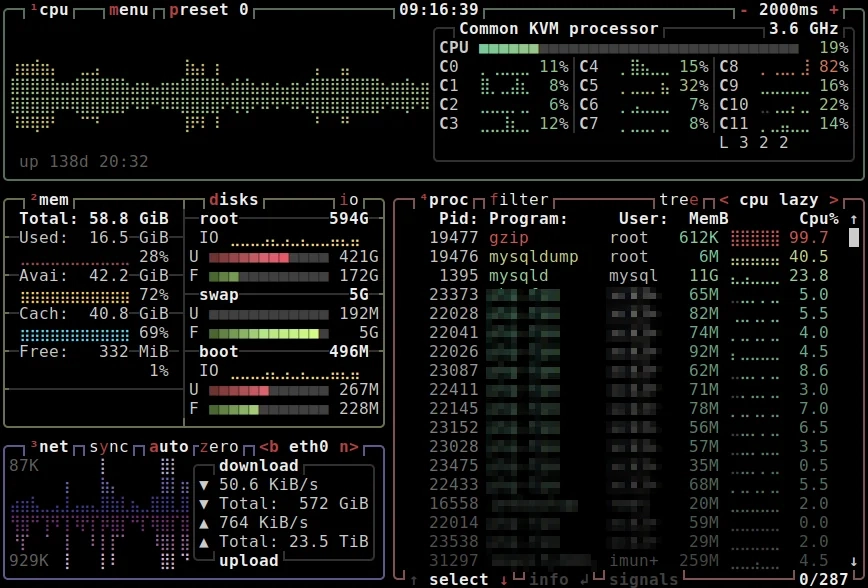
Click a process to select it, Esc opens the menu, Q quits. The + and - keys fold and unfold the panels if the screen feels crowded.
Done!
duf, disk space that reads like a table
df -h prints every loop device Docker ever created and leaves you squinting at the columns. duf shows the same information grouped, aligned and colored, with a usage bar per filesystem.
Install it
sudo apt install duf
Run it
sudo duf
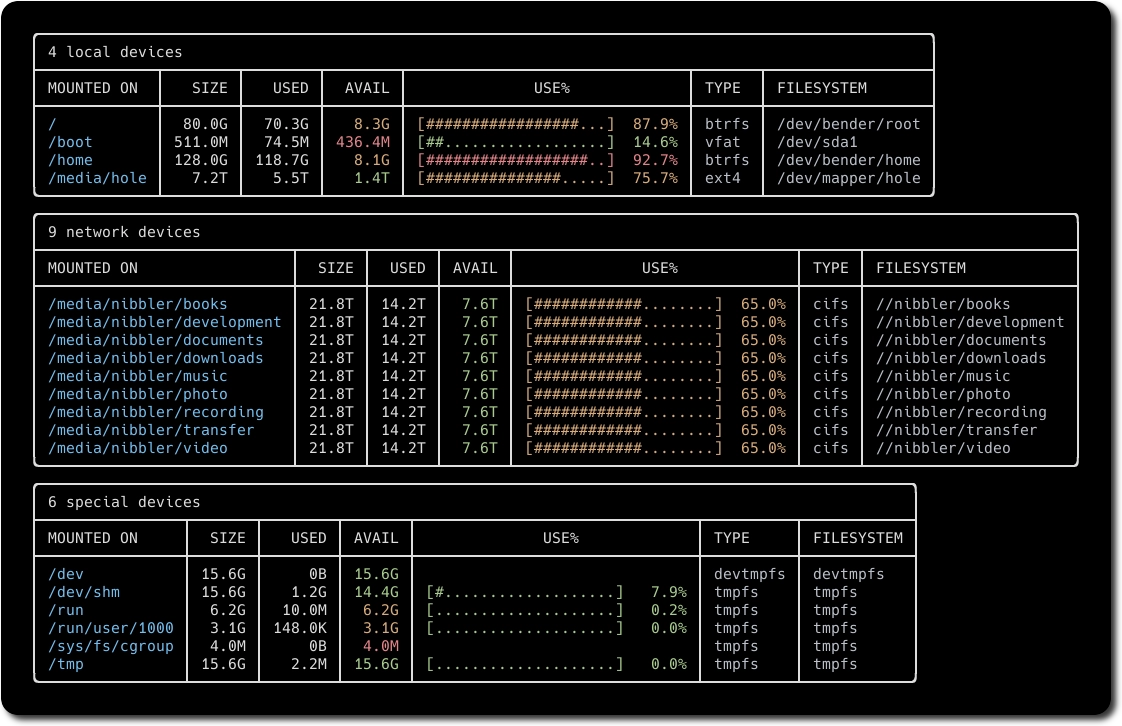
Local disks, network shares and system mounts are grouped separately. Add --only local to hide the pseudo-filesystems Docker leaves behind.
Done!
ncdu, finding what ate the disk
When duf tells you the disk is full, ncdu tells you why. It walks a folder, sorts everything by real size, and lets you drill down with the arrow keys instead of running du -sh * twenty times.
Install it
sudo apt install ncdu
Point it at a folder
sudo ncdu /srv/docker
Arrows to move, Enter to open a folder, D to delete the selected item, Q to quit. On a big disk the first scan takes a moment, it's reading everything.
ncdu without sudo when you're only looking, so a mistyped key can't touch anything the system owns.Done!
tldr, the manual without the 400 lines
man tar is exhaustive and unreadable. tldr tar gives you the five commands people actually type, with a one-line explanation each. It's community-maintained examples rather than a substitute for the real manual, and on Debian the client is packaged as tealdeer.
Install it
sudo apt install tealdeer
Download the page cache
tldr --update
The examples are fetched once and stored locally, so the command works offline afterwards. Run it again every few months.
Ask it something
tldr rsync
Done!
lazydocker, managing containers from the terminal
The one exception: it isn't packaged by Debian. It's a full text interface for Docker, containers, images, volumes and logs in one screen, with keys to restart, stop or follow the logs of anything. Handy when you're already in SSH and don't feel like opening Dockge.
Download the latest release
LAZYDOCKER_VERSION=$(curl -s https://api.github.com/repos/jesseduffield/lazydocker/releases/latest | grep -Po '"tag_name": "v\K[^"]*')
curl -Lo /tmp/lazydocker.tar.gz "https://github.com/jesseduffield/lazydocker/releases/latest/download/lazydocker_${LAZYDOCKER_VERSION}_Linux_x86_64.tar.gz"
The release asset's filename embeds the version number, so it can't be fetched with a plain latest link; the first command reads the current version from GitHub's API instead of hardcoding one that will go stale. Take arm64 instead of x86_64 if the server is a Raspberry Pi or similar.
Install the binary
sudo tar -xzf /tmp/lazydocker.tar.gz -C /usr/local/bin lazydocker
rm /tmp/lazydocker.tar.gz
/usr/local/bin is the folder meant for software you install yourself, which is why apt never touches it.
Check it landed
lazydocker --version
Run it
sudo lazydocker
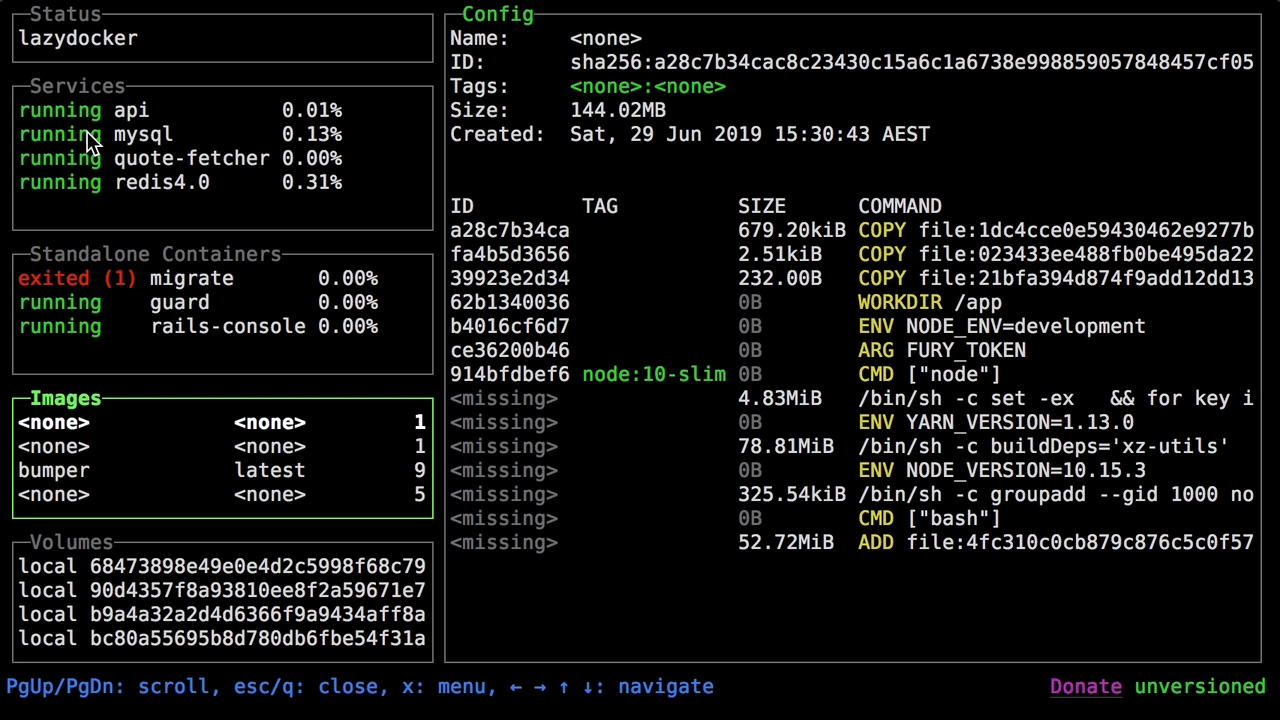
It needs access to the Docker socket, hence the sudo unless your user is in the docker group. The keys worth knowing:
| Key | What it does |
|---|---|
1 to 6 | Jump to a panel: projects, services, containers, images, volumes, networks |
| Arrows | Move inside the panel, the right side follows the selection |
| Enter | Focus the main panel on the right, Esc comes back |
x | Open the menu of everything you can do with what's selected |
m | Follow the logs |
s / r / p | Stop, restart, pause the selected container |
E | Open a shell inside the container |
d | Remove it |
b | Bulk commands, pruning images and volumes among others |
/ | Filter the list |
+ and _ | Grow or shrink the panels |
q | Quit |
Case matters: E opens a shell in the container, e hides the stopped ones.
The full list is in the project's documentation.
apt also means it won't be updated by apt full-upgrade. Repeat these steps when you want a newer version.Done!
ufw, a firewall you can actually read
Debian's firewall (iptables/nftables under the hood) is powerful and unreadable directly. ufw, uncomplicated firewall, is a thin layer on top that turns it into short, plain-English rules: block everything by default and open only what you actually expose.
Install it
sudo apt install ufw
Set the default policy
sudo ufw default deny incoming
sudo ufw default allow outgoing
Nothing gets in unless a rule says so, everything the server itself initiates still goes out normally.
Allow what you actually need
sudo ufw allow OpenSSH
sudo ufw allow 443/tcp
OpenSSH is a built-in profile that matches the SSH port, no need to remember which one. Add one allow per port you expose, SWAG on 443 for instance.
Enable it
sudo ufw enable
Check the rules
sudo ufw status verbose
Status: active
Logging: on (low)
Default: deny (incoming), allow (outgoing), disabled (routed)

To                         Action      From
--                         ------      ----
22/tcp (OpenSSH)           ALLOW IN    Anywhere
443/tcp                    ALLOW IN    Anywhere
Done!
Folders and partitions
How the Debian filesystem is organised, what each top-level folder holds, how partitions differ from folders, and the habits that keep a server tidy.
Introduction
Introduction to Serveex, a personal homelab project to self-host everyday services using Debian and Docker, replacing cloud services as Google, Apple or Netflix.