
SWAG
SWAG is the core of this homelab. It’s a powerful reverse proxy that allows you to expose services on the internet using domain names, handling SSL certificate issuance (for encrypted connections), request routing, and access security (via HTTP auth or SSO like Authelia or Authentik). All the necessary documentation is available here.
https://service.mydomain.com. If you don’t want to expose your services and prefer to always use a VPN to connect remotely, you can go here instead.Below is an example exposing Dockge. We will install SWAG along with the dbip mod for geolocation-based blocking, the dashboard mod for managing swag, fail2ban, and geolocation, and the auto-reload mod, which automatically reloads nginx whenever a config file changes, without having to restart the container.
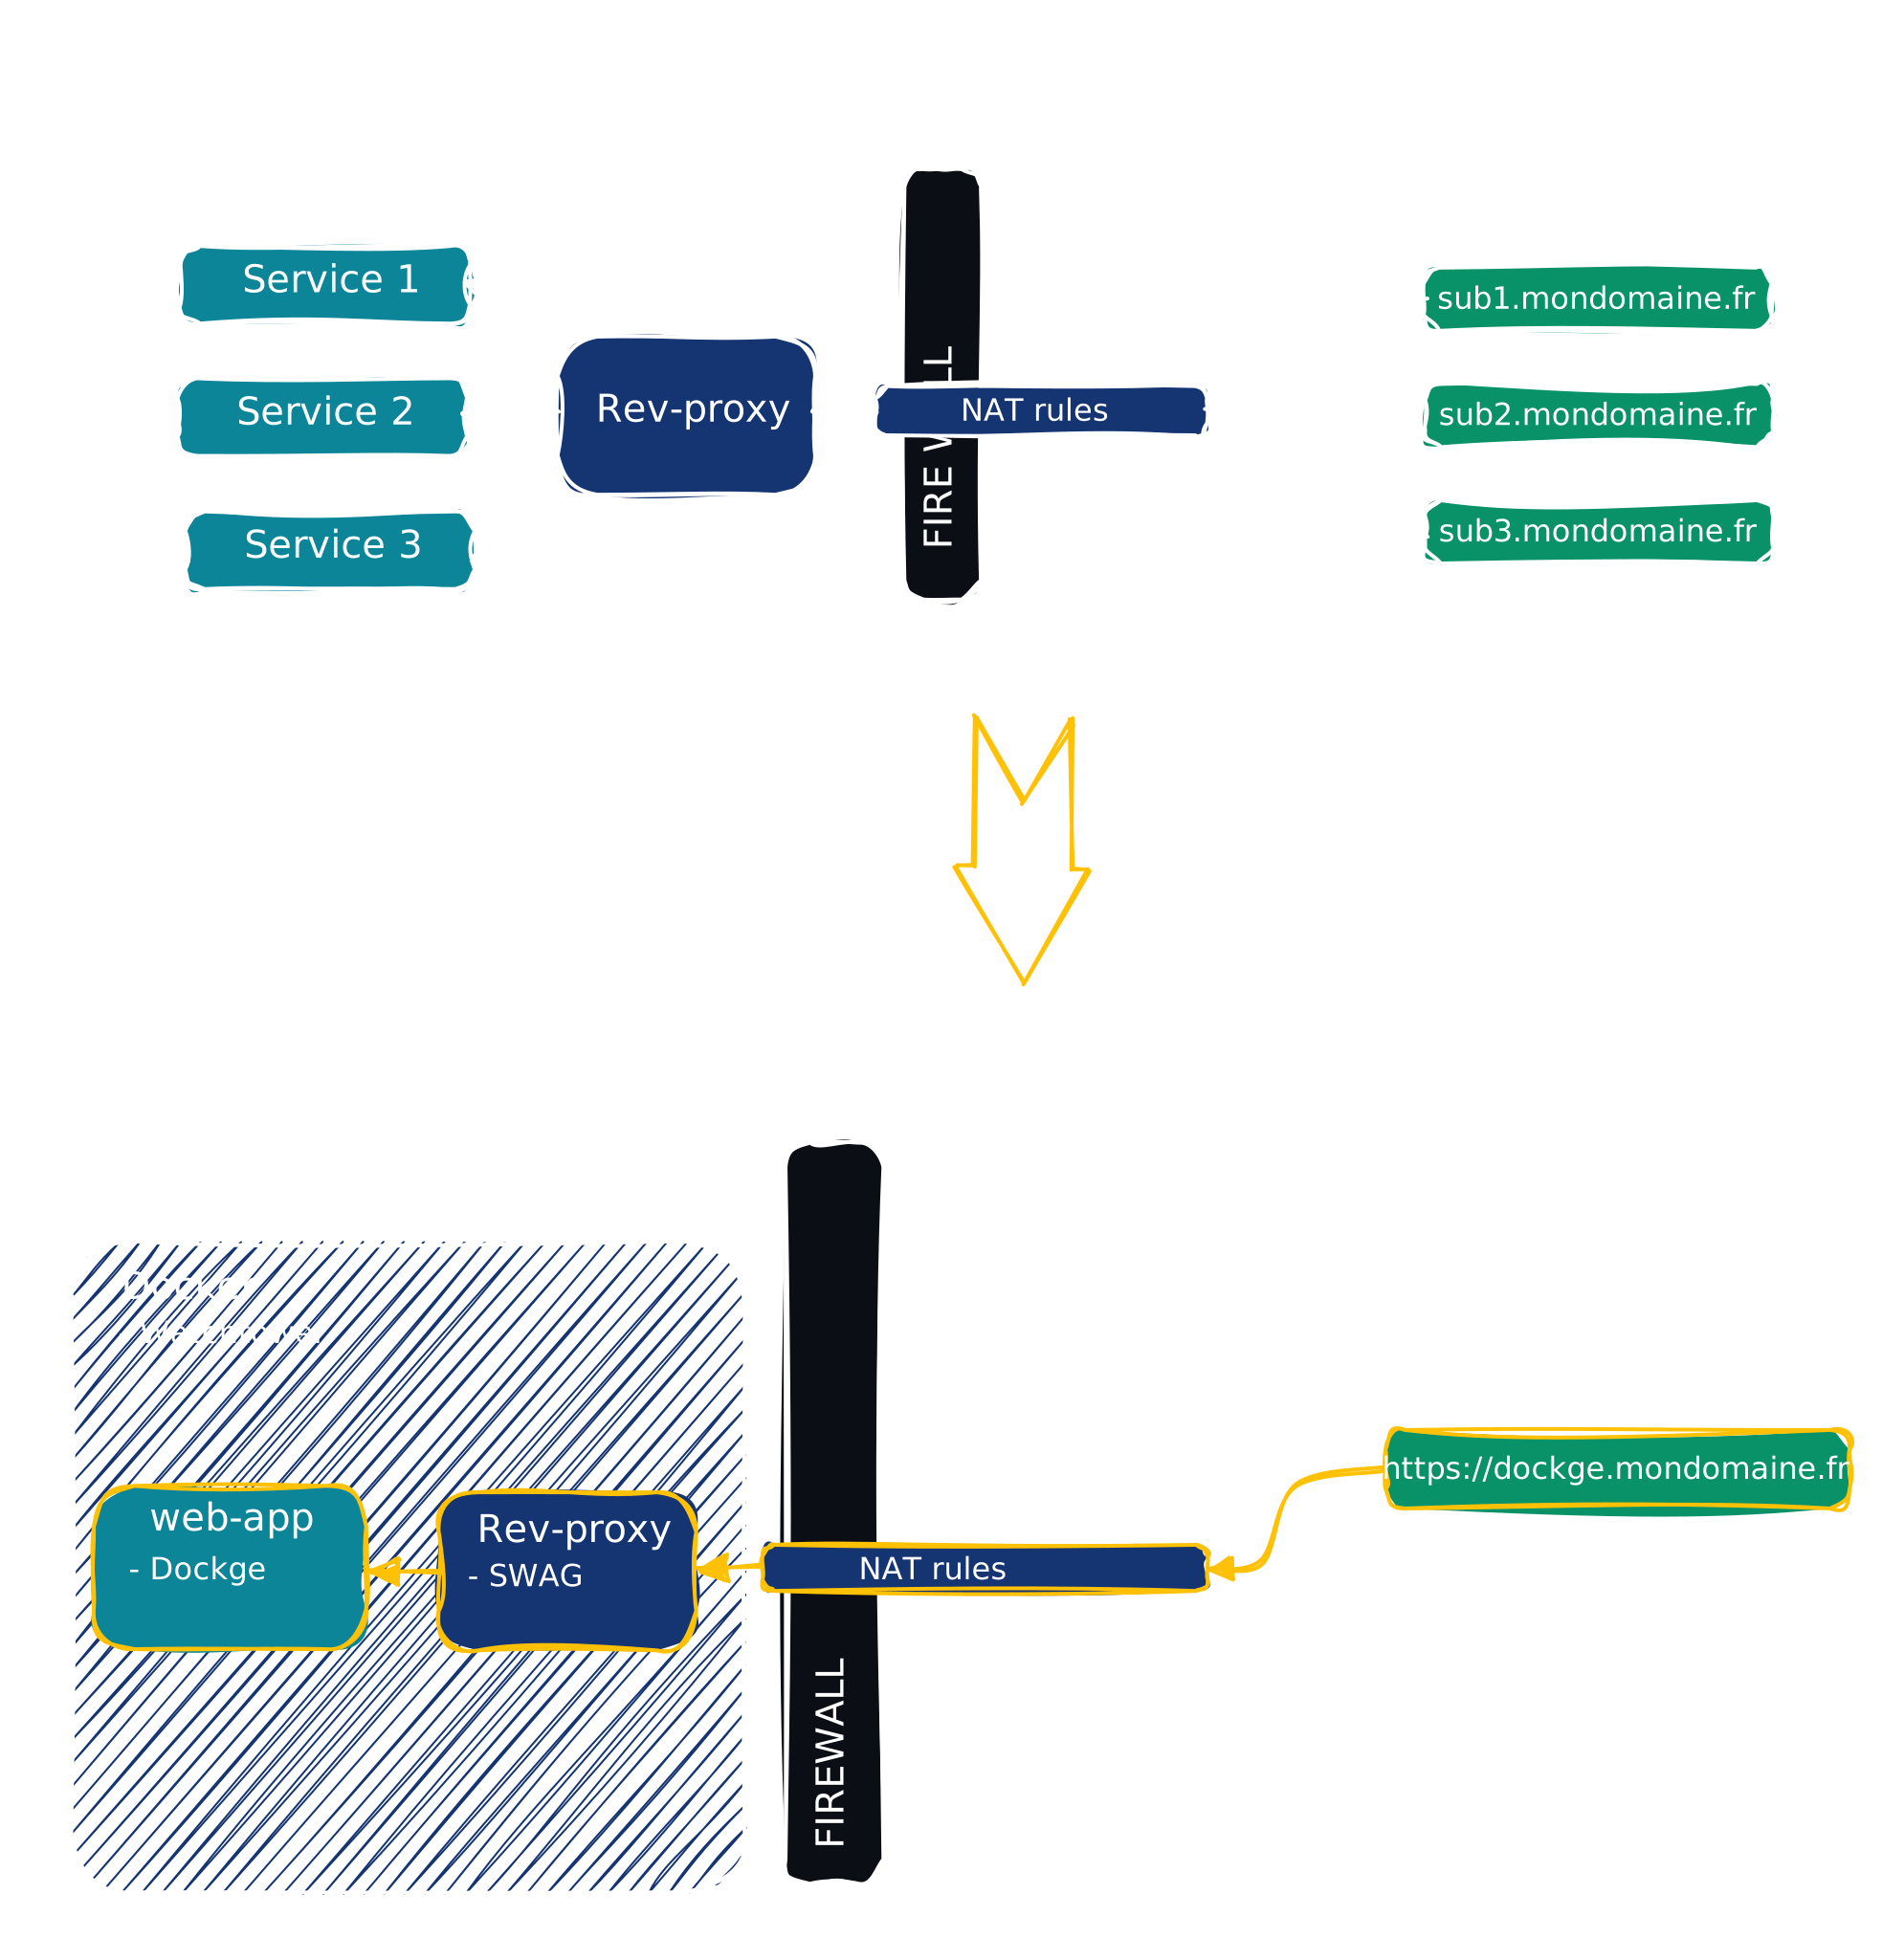
Reverse proxy principle and its application in our case:
Installation
443 to your server's IP and port 443. The example domain will be mydomain.com.- /
- srv
- docker
- swag
- config
- dns-conf
- ovh.ini
- nginx
- dbip.conf
- nginx.conf
- proxy-confs
- dockge.subdomain.conf
- dns-conf
- compose.yaml
- .env
- config
- swag
- docker
- srv
Deploy the stack
Open Dockge in your browser, click on compose, name the stack swag, and copy the following config:
---
services:
  swag:
    image: lscr.io/linuxserver/swag:latest
    container_name: swag
    cap_add:
      - NET_ADMIN
    env_file:
      - .env
    environment:
      - TZ=Europe/Paris
      - URL=${DOMAIN}
      - EXTRA_DOMAINS=${DOMAINS}
      - SUBDOMAINS=wildcard
      - VALIDATION=dns
      - DNSPLUGIN=${PLUGIN}
      - EMAIL=${EMAIL}
      - DOCKER_MODS=linuxserver/mods:swag-dbip|linuxserver/mods:swag-dashboard|linuxserver/mods:swag-auto-reload
    volumes:
      - /srv/docker/swag/config:/config
    ports:
      - 80:80
      - 443:443
      - 81:81
    restart: unless-stopped
    networks:
      - swag

networks:
  swag:
    name: swag_default
---
services:
  swag:
    #...
    labels:
      - com.centurylinklabs.watchtower.enable=true
Set your environment variables
Then in the .env file:
DOMAIN=
DOMAINS=
EMAIL=
PLUGIN=
Fill out the variables as follows:
| Property | Value | Examples |
|---|---|---|
DOMAIN | Your domain (covers all subdomains too) | mydomain.com |
DOMAINS | Any additional domains | myseconddomain.com |
EMAIL | Your email for generating the certificate | [email protected] |
PLUGIN | Plugin for certificate generation, depends on your DNS provider | ovhcloudflare |
Configure the OVH DNS plugin
Assuming your DNS zone is managed by OVH (if not, please check for your provider), deploy the stack once. The logs will show a failure in creating the SSL certificate due to a missing ovh.ini configuration. Stop the stack.
In CLI, go to the dns-conf folder and edit the ovh.ini file:
sudo nano /srv/docker/swag/config/dns-conf/ovh.ini
You should see:
# Instructions: https://github.com/certbot/certbot/blob/master/certbot-dns-ovh/certbot_dns_ovh/__init__.py#L20
# Replace with your values
dns_ovh_endpoint = ovh-eu
dns_ovh_application_key =
dns_ovh_application_secret =
dns_ovh_consumer_key =
Authenticate and create your token here.
Set the following permissions:
GET /domain/zone/*PUT /domain/zone/*POST /domain/zone/*DELETE /domain/zone/*
Note the 3 keys temporarily and enter them in ovh.ini. (In nano, just start typing, then Ctrl+O, Enter, Ctrl+X to save and exit)
Save with Ctrl+O, then Enter, and exit with Ctrl+X.
Enable DBIP in nginx.conf
Now configure SWAG to access DBIP, the geolocation-based access control module. Open the nginx.conf file:
sudo nano /srv/docker/swag/config/nginx/nginx.conf
Add the following line below the http section:
include /config/nginx/dbip.conf;
Restart the stack in Dockge. This time, the SSL certificate should be successfully generated! Check the logs to confirm the server is ready.
Done!
Dashboard
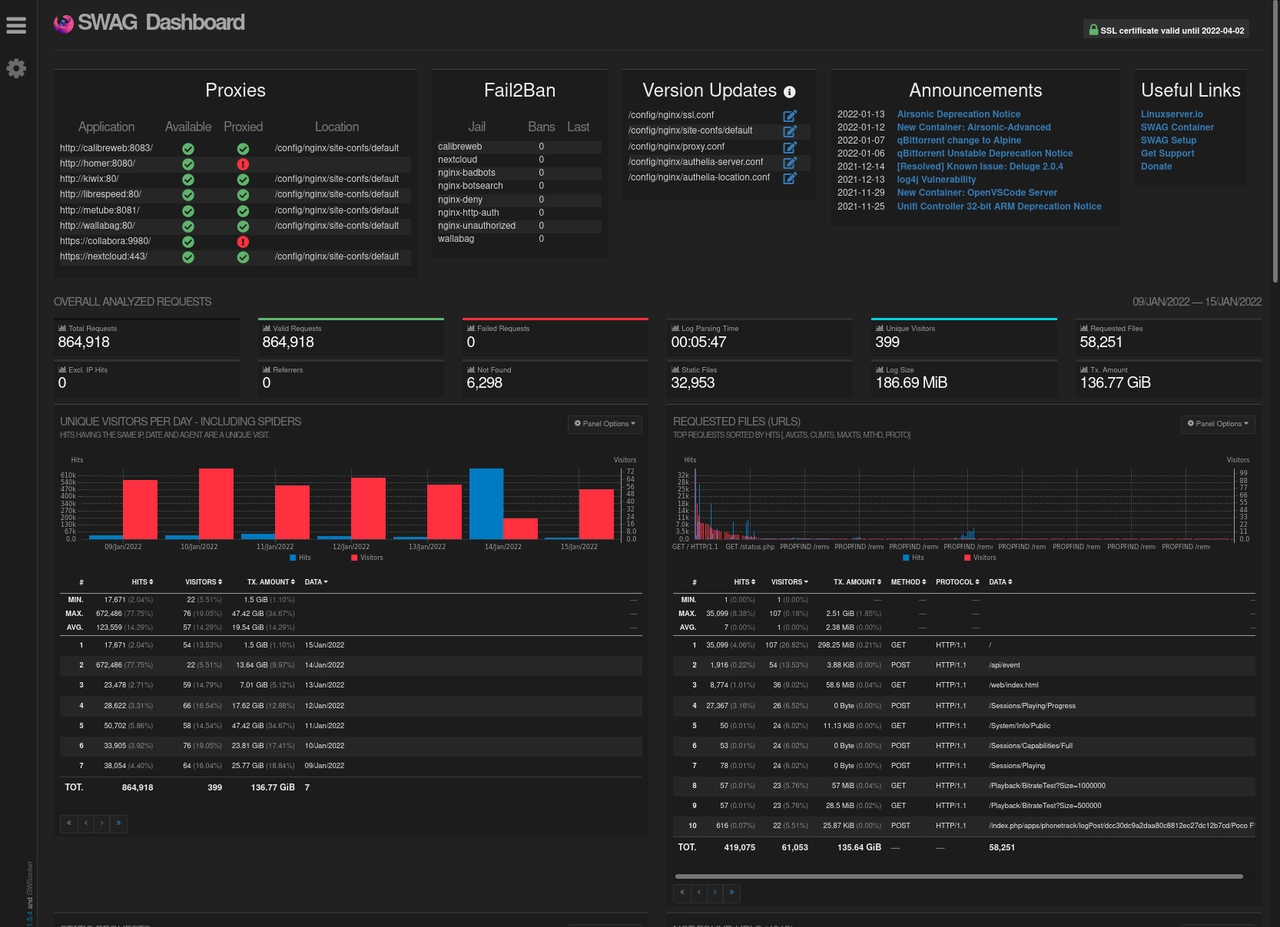
Access the dashboard locally by going to http://yourserverip:81
On the left, you'll see a list of currently "proxied" services (none yet). On the right, the list of banned IPs. Below, various indicators. For more details, click here.
DBIP
DBIP allows you to block connections based on countries. It relies on the configuration file named dbip.conf located in /srv/docker/swag/config/nginx. More info here.
In this example, we’ll configure it to block a list of countries known to be the source of most malicious traffic. We’ll also configure a variable to allow internal server traffic, your box’s local network, and a potential VPN in the 10.x.x.x range to access your services, but not the open internet.
This configuration can be enabled or disabled per service (see the Dockge example below).
Open dbip.conf
sudo nano /srv/docker/swag/config/nginx/dbip.conf
Make your changes
Refer to the documentation, or use the following example:
geoip2 /config/geoip2db/dbip-country-lite.mmdb {
    auto_reload 1w;
    $geoip2_data_continent_code   continent code;
    $geoip2_data_country_iso_code country iso_code;
}

# Country Codes: https://en.wikipedia.org/wiki/ISO_3166-2

map $geoip2_data_country_iso_code $geo-whitelist {
    default no;
    FR yes;
}

map $geoip2_data_country_iso_code $geo-blacklist {
    default yes;
    CN no; #China
    RU no; #Russia
    HK no; #Hong Kong
    IN no; #India
    IR no; #Iran
    VN no; #Vietnam
    TR no; #Turkey
    EG no; #Egypt
    MX no; #Mexico
    JP no; #Japan
    KR no; #South Korea
    KP no; #North Korea
    PE no; #Peru
    BR no; #Brazil
    UA no; #Ukraine
    ID no; #Indonesia
    TH no; #Thailand
}

geo $lan-ip {
    default no;
    10.0.0.0/8 yes;
    172.16.0.0/12 yes;
    192.168.0.0/16 yes;
    127.0.0.1 yes;
}
Save and restart
Save and close the file, then restart the stack.
Done!
In the domain config files (see next section), you can enable or disable the whitelist or blacklist (see documentation here). In our case, the whitelist allows only French requests. The blacklist blocks only the listed countries. We'll use the blacklist, like so:
server {
    listen 443 ssl;
    listen [::]:443 ssl;

    server_name some-app.*;

    include /config/nginx/ssl.conf;

    client_max_body_size 0;

    if ($geo-blacklist = no) { return 404; }

    location / {
        include /config/nginx/proxy.conf;
        include /config/nginx/resolver.conf;

        set $upstream_app some-app;
        set $upstream_port 1234;
        set $upstream_proto http;
        proxy_pass $upstream_proto://$upstream_app:$upstream_port;
    }
}
(Optional) Exposing Dockge
We assume that you have created a subdomain like
dockge.mydomain.com in your DNS zone, with a CNAME pointing to mydomain.com. Unless you're using Cloudflare Zero Trust, we also assume you've forwarded port 443 from your router to the server's 443 in your NAT rules.Now it's time to expose Dockge on the internet so you can access and manage your containers remotely. We assume you've set up the subdomain dockge.mydomain.com with a CNAME pointing to mydomain.com.
Create the subdomain.conf file
Open the dockge.subdomain.conf file:
sudo nano /srv/docker/swag/config/nginx/proxy-confs/dockge.subdomain.conf
Configure it like this:
## Version 2023/12/19

server {
    listen 443 ssl;
    listen [::]:443 ssl;

    server_name dockge.*;  # define the subdomain to redirect

    include /config/nginx/ssl.conf;

    client_max_body_size 0;

    #if ($lan-ip = yes) { set $geo-whitelist yes; }
    #if ($geo-whitelist = no) { return 404; }
    if ($geo-blacklist = no) { return 404; } # all countries un blacklist are forbidden

    #include /config/nginx/ldap-server.conf;
    #include /config/nginx/authelia-server.conf;
    #include /config/nginx/authentik-server.conf;

    location / {
        #auth_basic "Restricted";
        #auth_basic_user_file /config/nginx/.htpasswd;

        #include /config/nginx/ldap-location.conf;
        #include /config/nginx/authelia-location.conf;
        #include /config/nginx/authentik-location.conf;

        include /config/nginx/proxy.conf;
        include /config/nginx/resolver.conf;

        set $upstream_app dockge; # container name
        set $upstream_port 5001; # internal container port (not exposed port)
        set $upstream_proto http;
        proxy_pass $upstream_proto://$upstream_app:$upstream_port;
    }
}
Save and exit. The configuration will update within a few seconds.
compose.yaml.Add Dockge's network to SWAG
Go to the SWAG stack, click edit, and modify the config file like this (note the networks section):
---
services:
  swag:
    container_name: #...
    # ...
    networks:            # Link the container to the custom network

      - dockge           # Network name as defined in the stack

networks:                # Define the custom network
  # ...
  dockge:                # Network name as defined in the stack
    name: dockge_default # True external network name
    external: true
dockge_default. You can verify the setup works by checking the SWAG dashboard at http://yourserverip:81.Redeploy the SWAG stack.
Visit your new subdomain
Wait a moment, then visit https://dockge.mydomain.com in your browser. You should be redirected to Dockge. You can also check the service status from the dashboard (http://yourserverip:81 on your local network).
Done!
Exposing Another Service with SWAG
SWAG includes templates for most known services, named servicename.subdomain.conf.sample. Just create the subdomain in your registrar's DNS zone (like OVH), point it to your main domain via a CNAME, then copy and rename the sample file:
cd /srv/docker/swag/config/nginx/proxy-confs
sudo cp servicename.subdomain.conf.sample servicename.subdomain.conf
- Open the file and verify the container name in
set $upstream_app containername; - Make sure you added the container's network in SWAG’s
compose.yaml
You can also customize the subdomain by editing server_name yoursubdomain.*; and renaming the file to yoursubdomain.subdomain.conf.