
Authentik
Authentik is a single sign-on (SSO) tool that allows you to log in once to all platforms compatible with OpenID. It can also secure access to your exposed services by injecting itself via SWAG into requests to those services.
For example, if you're exposing Dockge online at dockge.mydomain.com, you’ll first land on an Authentik login page when accessing it. If you've already authenticated with another Authentik-protected service, you won’t need to log in again. This allows you to authenticate only once per day for all protected services.
Authentik also supports multi-factor authentication, including TOTP (a code generated by the authentication app of your choice). Additionally, it allows login through Microsoft or Google accounts, provided you've configured one of those applications.
It's a great alternative to VPNs for securely exposing services, especially ones that lack MFA or login protection (e.g., the SWAG dashboard).
Authentik has extensive documentation and great tutorials from Cooptonian. Here, we’ll cover the basics using Dockge as an example.
There are two main modes you should know:
- The first allows apps with native support for OpenID-compatible SSO to connect directly to Authentik. This is the preferred method, as the app itself decides what’s public and what’s protected.
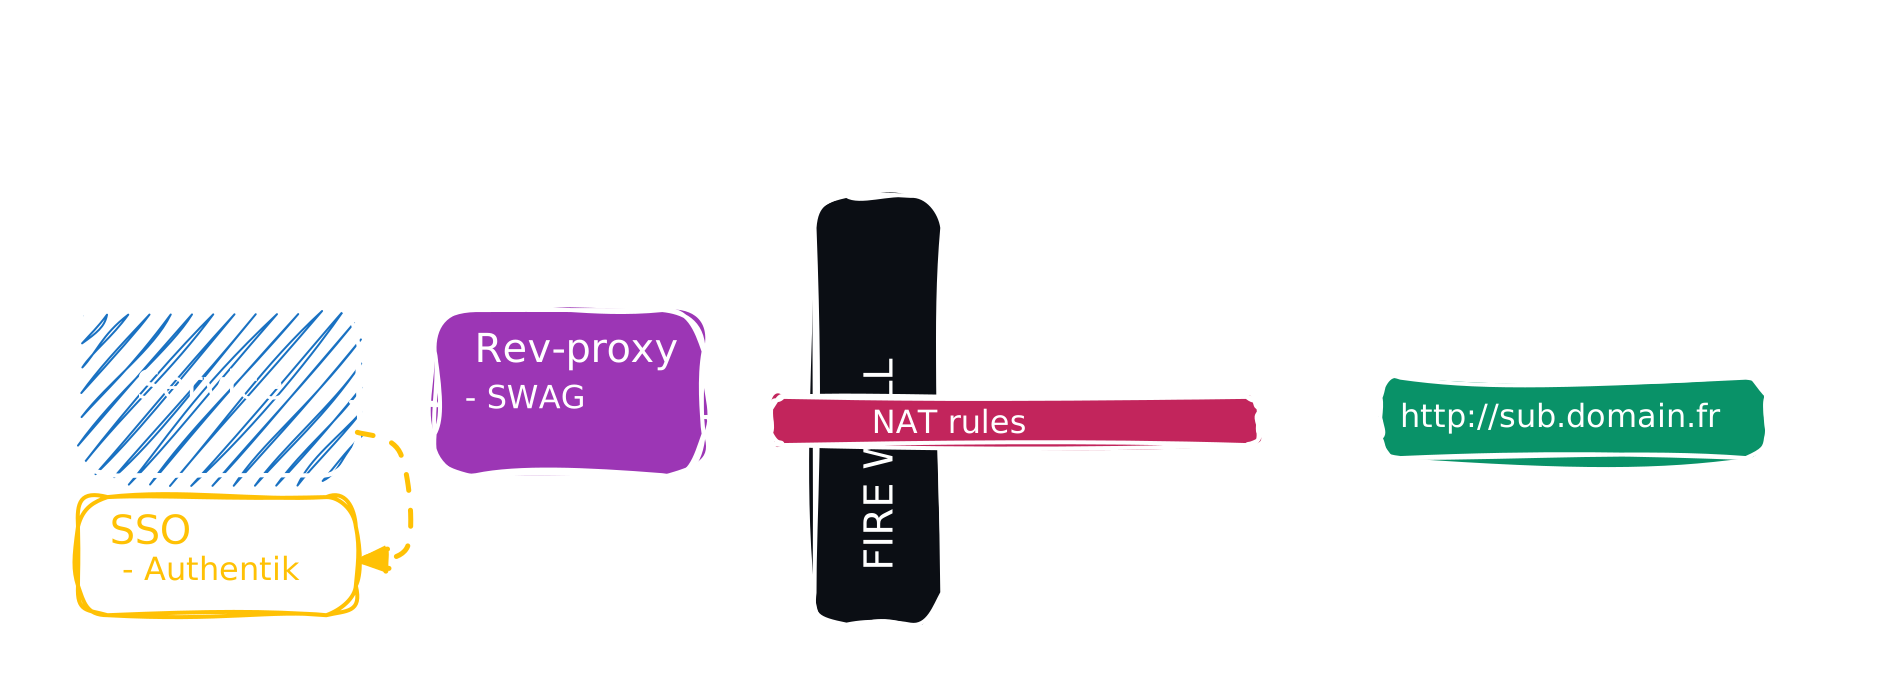
- The second method injects Authentik authentication through SWAG before reaching the target service.
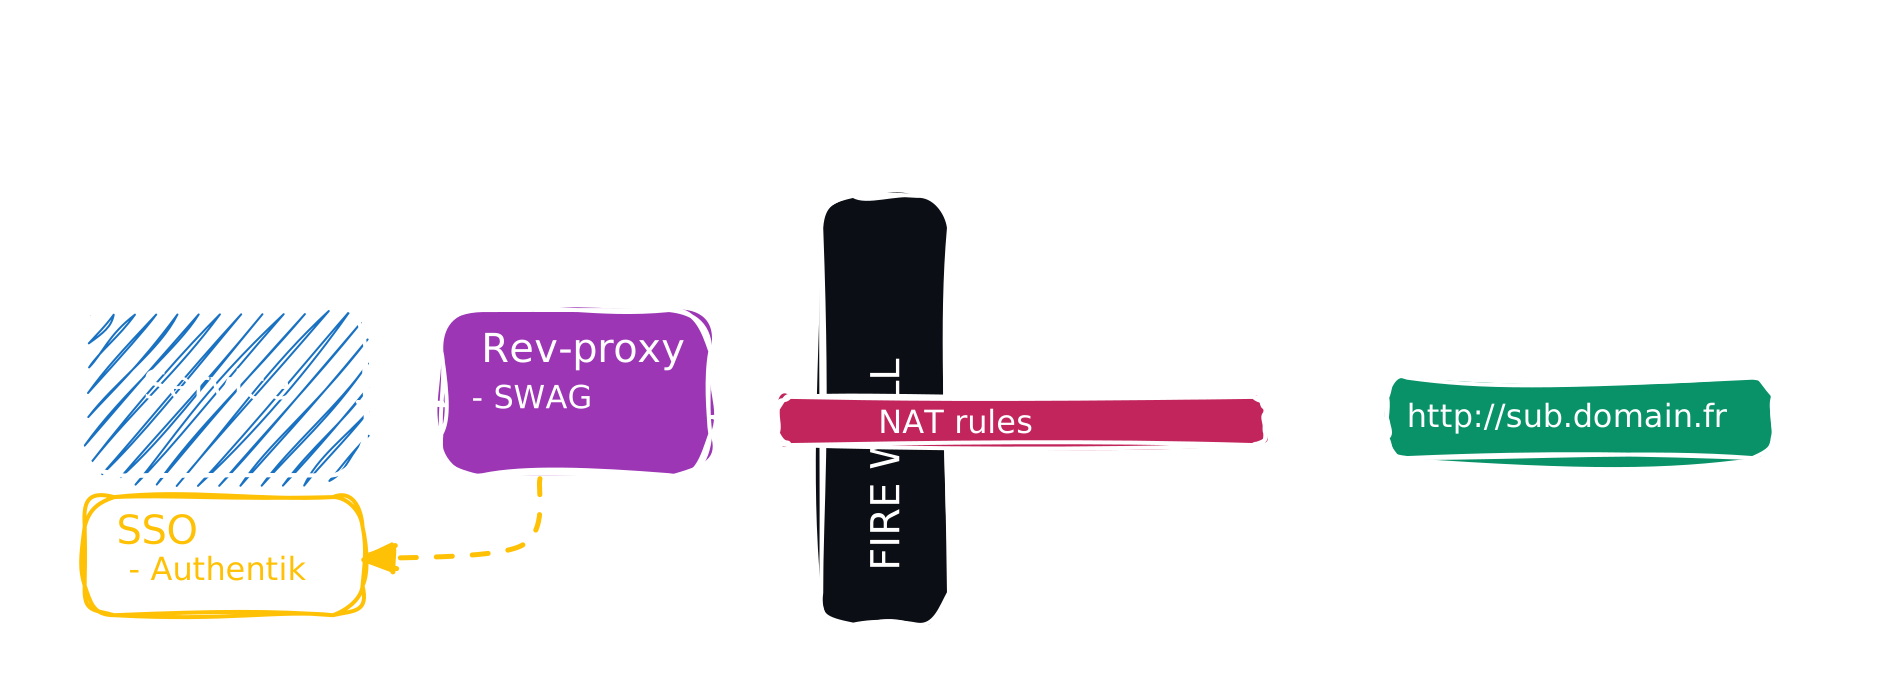
Both modes can be configured on a per-application basis.
Installation
- /
- srv
- docker
- authentik
- .env
- compose.yaml
- media
- certs
- custom-template
- ssh
- authentik
- docker
- srv
Create the folders
sudo mkdir -p /srv/docker/authentik/media /srv/docker/authentik/certs /srv/docker/authentik/custom-template /srv/docker/authentik/ssh
Generate secrets
Navigate to the authentik folder via cd /srv/docker/authentik and generate a password and secret key to include in the .env file:
echo "PG_PASS=$(openssl rand 36 | base64)" | sudo tee -a .env
echo "AUTHENTIK_SECRET_KEY=$(openssl rand 60 | base64)" | sudo tee -a .env
compose.yaml file exists. So, create an empty compose.yaml so it appears as an inactive stack:
bash [Terminal] sudo nano /srv/docker/authentik/compose.yaml Deploy the stack
Open Dockge and search for "authentik" in the inactive stacks.
Name the stack authentik and paste the following configuration, replacing {AUTHENTIK_TAG:-2026.2} with the latest version of Authentik.
---
services:

  postgresql:
    image: docker.io/library/postgres:16-alpine
    container_name: authentik-postgresql
    restart: unless-stopped
    healthcheck:
      test:
        - CMD-SHELL
        - pg_isready -d $${POSTGRES_DB} -U $${POSTGRES_USER}
      start_period: 20s
      interval: 30s
      retries: 5
      timeout: 5s
    volumes:
      - database:/var/lib/postgresql/data
    environment:
      POSTGRES_PASSWORD: ${PG_PASS:?database password required}
      POSTGRES_USER: ${PG_USER:-authentik}
      POSTGRES_DB: ${PG_DB:-authentik}
    env_file:
      - .env

  redis:
    image: docker.io/library/redis:alpine
    container_name: authentik-redis
    command: --save 60 1 --loglevel warning
    restart: unless-stopped
    healthcheck:
      test:
        - CMD-SHELL
        - redis-cli ping | grep PONG
      start_period: 20s
      interval: 30s
      retries: 5
      timeout: 3s
    volumes:
      - redis:/data

  server:
    image: ${AUTHENTIK_IMAGE:-ghcr.io/goauthentik/server}:${AUTHENTIK_TAG:-2026.2}
    container_name: authentik-server
    restart: unless-stopped
    command: server
    environment:
      AUTHENTIK_REDIS__HOST: redis
      AUTHENTIK_POSTGRESQL__HOST: postgresql
      AUTHENTIK_POSTGRESQL__USER: ${PG_USER:-authentik}
      AUTHENTIK_POSTGRESQL__NAME: ${PG_DB:-authentik}
      AUTHENTIK_POSTGRESQL__PASSWORD: ${PG_PASS}
    volumes:
      - ./media:/media
      - ./custom-templates:/templates
      - ./ssh:/authentik/.ssh
    env_file:
      - .env
    ports:
      - ${COMPOSE_PORT_HTTP:-9000}:9000
      - ${COMPOSE_PORT_HTTPS:-9443}:9443
    depends_on:
      - postgresql
      - redis

  worker:
    image: ${AUTHENTIK_IMAGE:-ghcr.io/goauthentik/server}:${AUTHENTIK_TAG:-2026.2}
    container_name: authentik-worker
    restart: unless-stopped
    command: worker
    environment:
      AUTHENTIK_REDIS__HOST: redis
      AUTHENTIK_POSTGRESQL__HOST: postgresql
      AUTHENTIK_POSTGRESQL__USER: ${PG_USER:-authentik}
      AUTHENTIK_POSTGRESQL__NAME: ${PG_DB:-authentik}
      AUTHENTIK_POSTGRESQL__PASSWORD: ${PG_PASS}
    # `user: root` and the Docker integration below are optional, only needed if you
    # want Authentik to auto-manage embedded outposts on this host. See:
    # https://goauthentik.io/docs/outposts/integrations/docker
    # Removing `user: root` also prevents the worker from fixing the permissions
    # on the mounted folders, so when removing this make sure the folders have the correct UID/GID
    # (1000:1000 by default)
    user: root
    volumes:
      - ./media:/media
      - ./certs:/certs
      - ./custom-templates:/templates
      - ./ssh:/authentik/.ssh
    networks:
      - default
      - authentik-internal
    env_file:
      - .env
    depends_on:
      - postgresql
      - redis
      - docker-socket-proxy

  docker-socket-proxy:
    image: lscr.io/linuxserver/socket-proxy:latest
    container_name: docker-socket-proxy-authentik
    security_opt:
      - no-new-privileges:true
    networks:
      - authentik-internal
    volumes:
      - /var/run/docker.sock:/var/run/docker.sock:ro
    environment:
      - CONTAINERS=1
      - IMAGES=1
      - NETWORKS=1
      - INFO=1
      - POST=1
      - ALLOW_START=1
      - ALLOW_STOP=1
      - ALLOW_RESTARTS=1
    restart: unless-stopped
    read_only: true
    tmpfs:
      - /run

networks:
  authentik-internal:
    name: authentik-internal

volumes:
  database:
    driver: local
  redis:
    driver: local
/var/run/docker.sock mounted directly into the worker. If you enable it, set the connection's Docker URL in the admin UI to http://docker-socket-proxy:2375 instead of the local socket path, as Authentik's own docs recommend for socket-proxy setups.Begin the initial setup
In the .env file, the PG_PASS and AUTHENTIK_SECRET_KEY variables are already set.
Deploy the stack.
You can then begin the initial setup by visiting:http://yourserverip:9000/if/flow/initial-setup/
akadmin account.Done!
Exposing Authentik
To use Authentik outside your local network, you must expose it.
We assume you have already created a subdomain like
auth.mydomain.com in your DNS zone, with a CNAME pointing to mydomain.com. Also, unless you're using Cloudflare Zero Trust, you must have already forwarded port 443 from your router to port 443 of your server in your NAT rules.Verify authentik-server.conf
Open the authentik-server.conf file:
sudo nano /srv/docker/swag/config/nginx/authentik-server.conf
Verify that the following variables are set correctly:
set $upstream_authentik authentik-server;
proxy_pass http://$upstream_authentik:9000;
If not, make the necessary changes, then save with Ctrl+O, Enter, and exit with Ctrl+X.
Create the subdomain.conf file
Create the auth.subdomain.conf file:
sudo nano /srv/docker/swag/config/nginx/proxy-confs/auth.subdomain.conf
Paste the following configuration:
## Version 2023/05/31
# Ensure your authentik container is named authentik-server
# Ensure your DNS has a CNAME for authentik

server {
    listen 443 ssl;
    listen [::]:443 ssl;

    server_name auth.*;

    include /config/nginx/ssl.conf;

    client_max_body_size 0;

    location / {
        include /config/nginx/proxy.conf;
        include /config/nginx/resolver.conf;
        set $upstream_app authentik-server;
        set $upstream_port 9000;
        set $upstream_proto http;
        proxy_pass $upstream_proto://$upstream_app:$upstream_port;
    }

    location ~ (/authentik)?/api {
        include /config/nginx/proxy.conf;
        include /config/nginx/resolver.conf;
        set $upstream_app authentik-server;
        set $upstream_port 9000;
        set $upstream_proto http;
        proxy_pass $upstream_proto://$upstream_app:$upstream_port;
    }
}
Save with Ctrl+O, then Enter, and exit with Ctrl+X.
Add Authentik's network to SWAG
Go to Dockge, and edit the SWAG compose file to add the Authentik network:
---
services:
  swag:
    container_name: # ...
      # ...
    networks:               # Attach the container to the custom network
      # ...
      - authentik            # Name of the network declared in the stack

networks:                    # Define the custom network
  # ...
  authentik:                 # Name of the network declared in the stack
    name: authentik_default  # Actual name of the external network
    external: true           # Indicates it's an external network
Restart the stack and wait for SWAG to be fully operational.
Done!
You can now access Authentik via https://auth.mydomain.com
Enable Multifactor Authentication
The main value of Authentik is using multifactor authentication for all protected apps.
Log in to Authentik
Go to https://auth.mydomain.com and log in.
Register an MFA method
Go to Settings, click the MFA section, then Register. Choose a method like TOTP device (you'll need an authenticator app like Google Authenticator) and follow the steps.
Done!
You’ll now be prompted to enter a one-time code at every login.
Protecting a Native App
Authentik is natively compatible with several applications. You can find the list and support here.
Protecting an App via Reverse Proxy
SWAG lets you insert Authentik’s login page between a request and access to your service. To do this:
- Configure the authentication provider in Authentik.
- Edit the domain proxy file so SWAG can intercept the request.
Why do this when Dockge already has authentication? Because Dockge uses weak HTTP authentication. With Authentik, you get strong MFA authentication and automatic login to all apps protected by Authentik. This secures access to Dockge and other apps without needing a VPN.
Configuring Authentik
- Go to Authentik
- Open the admin panel
- Select Applications then Create with wizard
- Fill in the fields as shown:
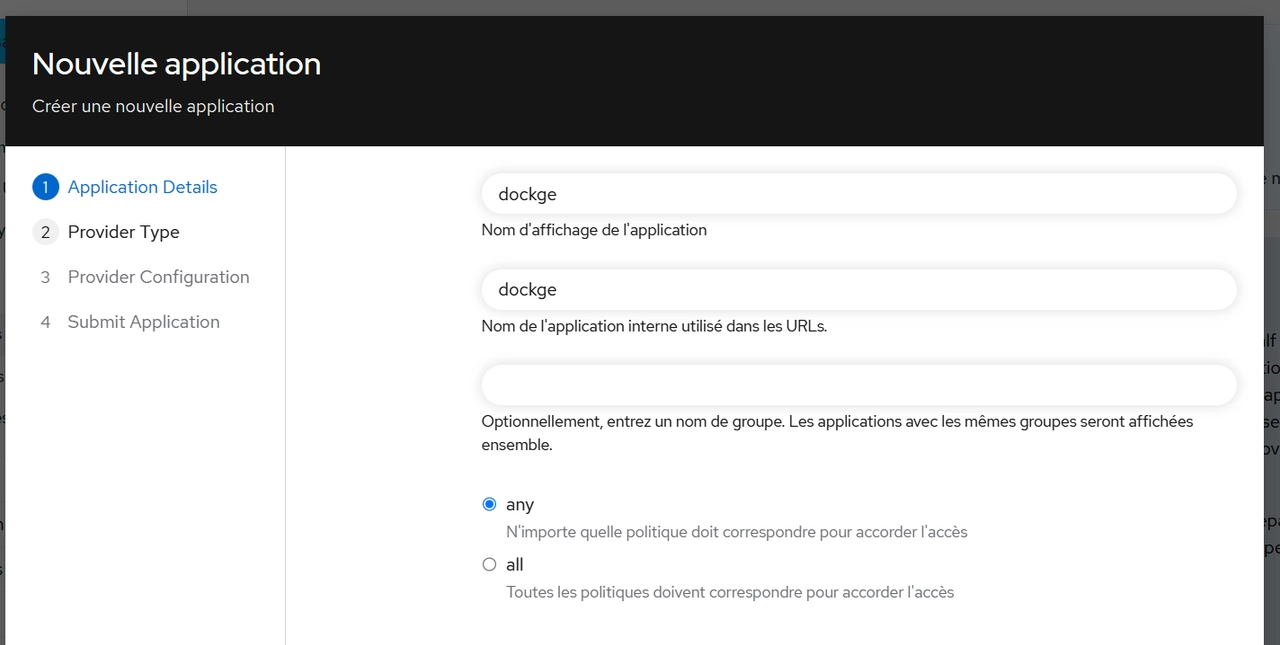
- At the next step, choose "Forward authentication (single application)" and configure it as shown (flows are important):
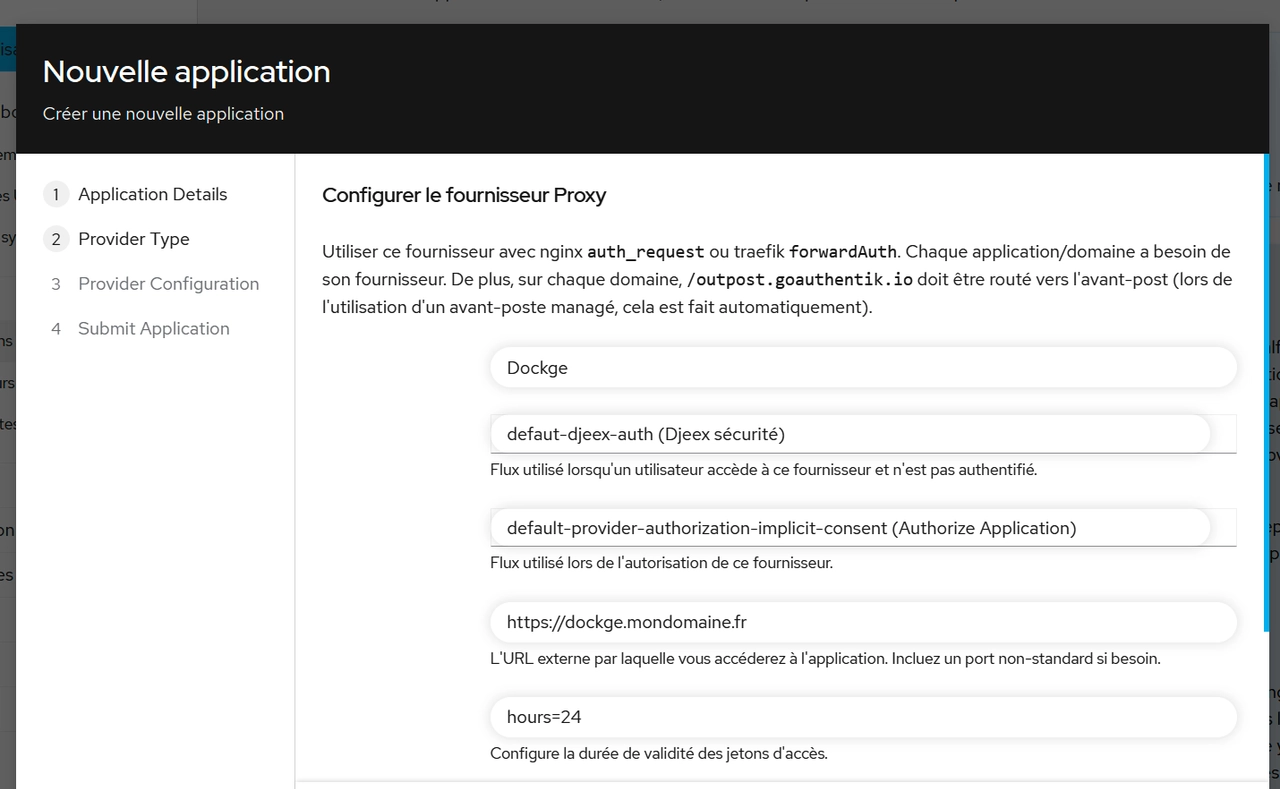
- Next, go to the Outposts menu on the left and edit authentik Embedded Outpost:

- Add the
dockgeapplication by moving it to the right column and save.
Configuring SWAG
Edit the file dockge.mydomain.com:
sudo nano /srv/docker/swag/config/nginx/proxy-confs/dockge.subdomain.conf
Uncomment the two lines #include /config/nginx/authentik-server.conf;
Press Ctrl+O, then Enter to save, and Ctrl+X to exit.
Done!
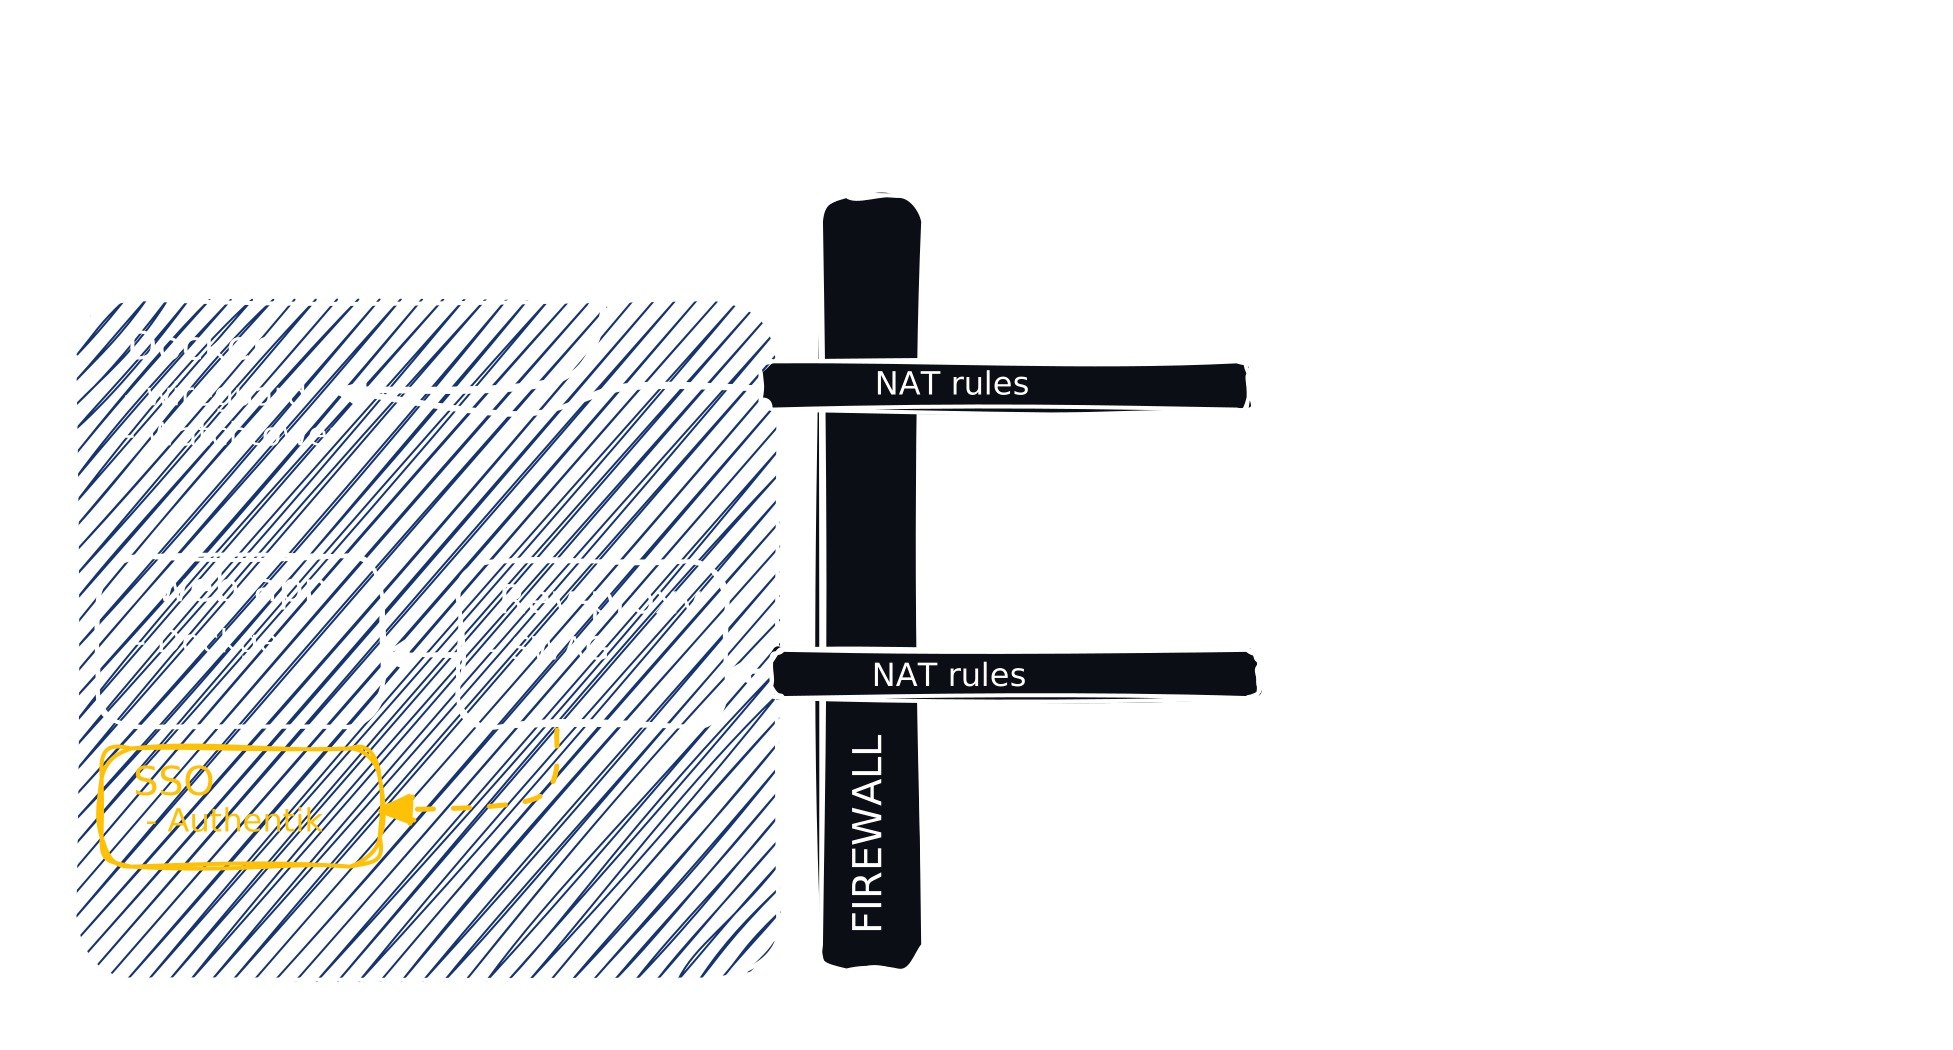
Now when accessing https://dockge.mydomain.com, you’ll be redirected to the Authentik login screen.
Your new architecture looks like this:
Protecting a Remote Server Service
For a native application (via OAuth 2.0 or other), nothing changes.
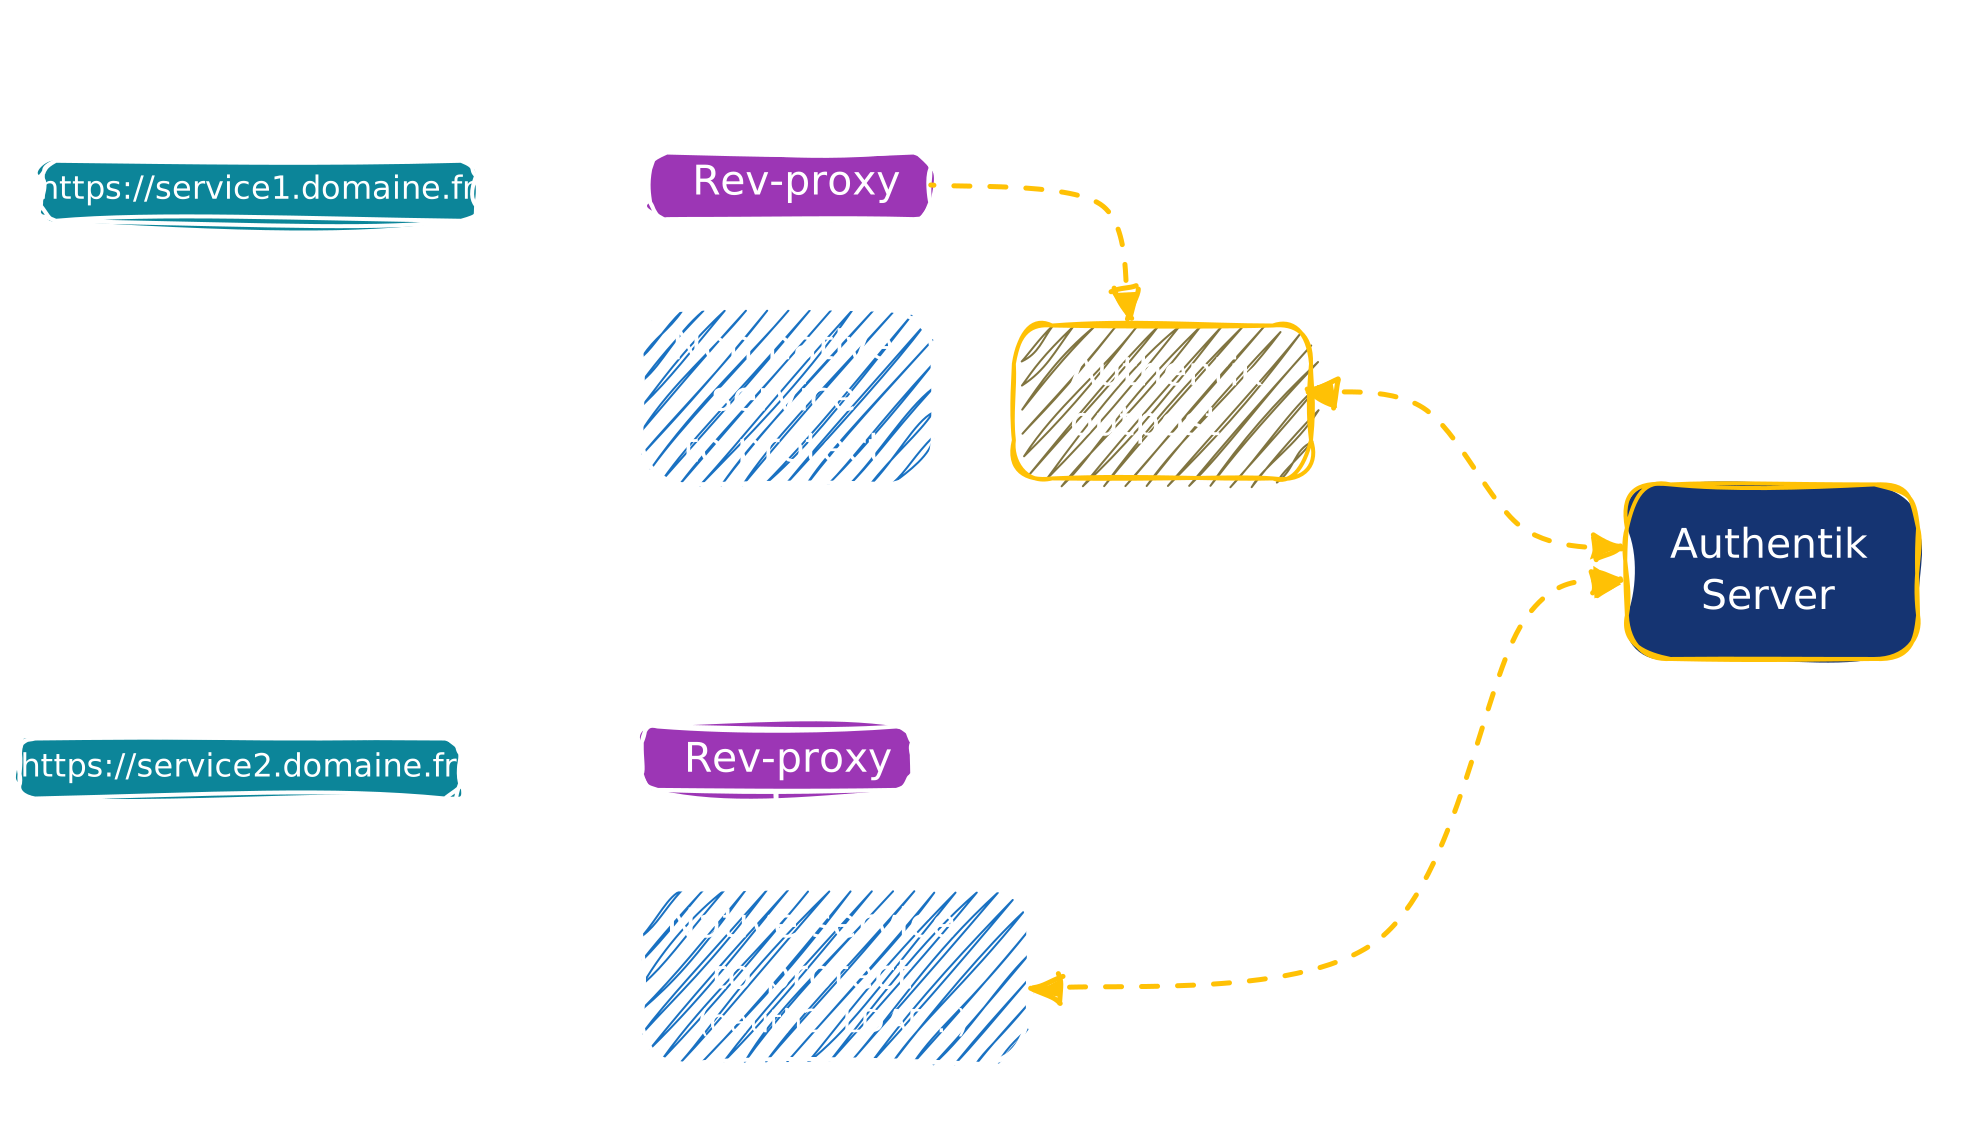
For a non-native app behind a reverse proxy, you must deploy an Outpost. An Outpost is a container acting as a local proxy. It's the target of your app's auth requests and the only one authorized to communicate with your Authentik API.
This container will forward requests to your main Authentik instance over the internet (or your local network). The server will perform checks and respond to the Outpost, which will allow or block access accordingly.
Configuring Authentik
Create your providers and applications as shown earlier.
Then, in the admin panel, go to Applications > Outposts, and create a new outpost.
Fill in as follows:
| Field | Value |
|---|---|
Name | Your preferred name |
Type | Proxy |
Integration | Leave empty |
Applications | Select the applications you previously created |
In the Advanced settings section, clear the existing content and enter:
log_level: info
docker_labels: null
authentik_host: https://your_authentik_server_domain/
object_naming_template: ak-outpost-%(name)s
authentik_host_insecure: false
container_image:
docker_network: null
docker_map_ports: true
Save with Ctrl+O, then Enter, and exit with Ctrl+X.
On the list of created outposts, locate the new one and click Show details at the end of the line. Carefully copy the access token.
We assume you’ve already installed Docker and SWAG on this remote machine. Here's how to configure it:
Create the stack folder
On your remote machine, use Dockge to create a stack named authentik-outpost.
If you haven’t installed Dockge, create a folder /srv/docker/authentik-outpost, or directly via command line:
sudo mkdir -p /srv/docker/authentik-outpost
Create the compose file
Create the compose.yaml file or paste the configuration directly into Dockge if installed.
Via command line:
sudo nano /srv/docker/authentik-outpost/compose.yaml
Paste the following configuration, updating the version in ghcr.io/goauthentik/proxy:2026.2 to match your Authentik server version.
---
version: "3.5"
services:
  authentik_proxy:
    container_name: authentik-outpost
    image: ghcr.io/goauthentik/proxy:2026.2
    # Optionally specify which networks the container should be
    # might be needed to reach the core authentik server
    restart: unless-stopped
    env_file:
      - .env
    ports:
      - 9000:9000
      - 9443:9443
    environment:
      AUTHENTIK_HOST: ${HOST}
      AUTHENTIK_INSECURE: "false"
      AUTHENTIK_TOKEN: ${TOKEN}
Add the outpost network to SWAG
Go to the SWAG stack on the remote machine (or edit directly using Dockge) and add the authentik-outpost network in the configuration file like this (see networks section):
sudo nano /srv/docker/swag/compose.yaml
---
services:
  swag:
    container_name: #...
      # ...
    networks:                      # Attach the container to the custom network

      - authentik-outpost           # Network name as declared in the stack

networks:                           # Define the custom network
  #...
  authentik-outpost:                # Name of the network declared in the stack
    name: authentik-outpost_default # Actual name of the external network
    external: true                  # Marks it as an external network
Press Ctrl+O, then Enter to save, and Ctrl+X to exit.
authentik-outpost_default.Restart SWAG
If using Dockge, restart SWAG.
Otherwise, via terminal:
cd /srv/docker/swag/
sudo docker compose up -d
Set your environment variables
Create (or fill using Dockge) the .env file in the authentik-outpost directory:
Via command line:
sudo nano /srv/docker/authentik-outpost/.env
Paste the following configuration:
HOST=
TOKEN=
Fill in the values:
| Variable | Value | Example |
|---|---|---|
HOST | The URL of your Authentik server | https://auth.domain.com |
TOKEN | The previously copied access token | Q2pVEqsTNRkJSO9SkJzU3KZ2 |
Press Ctrl+O, then Enter to save, and Ctrl+X to exit.
Deploy the stack
If using Dockge, deploy the stack.
Otherwise, via terminal:
cd /srv/docker/authentik-outpost/
sudo docker compose up -d
The container is now running. You can verify its status from your Authentik instance admin panel under Applications > Outposts.
Point SWAG at the outpost
Now, let’s configure SWAG.
Open the authentik-server.conf file:
sudo nano /srv/docker/swag/config/nginx/authentik-server.conf
In the file, change authentik-server to authentik-outpost as shown:
set $upstream_authentik authentik-outpost;
proxy_pass http://$upstream_authentik:9000;
Save with Ctrl+O, then Enter, and exit with Ctrl+X.
Done!
Then configure the applications to protect as you did on your main server, whether they are native or protected via reverse proxy.
Migrating an Authentik Database
authentik-postgresql, matching the Installation section above. Adjust it if you renamed yours.Dump the database
On the source machine, dump the database:
sudo docker exec authentik-postgresql pg_dump -U authentik -F t authentik > /path/to/mydb.tar
Transfer the dump
Transfer it to the target machine, then copy the file into the Docker container:
cp /path/to/mydb.tar authentik-postgresql:/path/to/wherever
Purge existing tables
(Optional) Purge existing tables:
sudo docker exec -i authentik-postgresql psql -U authentik -c "SELECT pg_terminate_backend(pg_stat_activity.pid) FROM pg_stat_activity WHERE pg_stat_activity.datname = 'authentik' AND pid <> pg_backend_pid();" && sudo docker exec -i authentik-postgresql psql -U authentik -d postgres -c "DROP DATABASE IF EXISTS authentik;" && sudo docker exec -i authentik-postgresql psql -U authentik -d postgres -c "CREATE DATABASE authentik;"
Restore the database
Restore the database:
sudo docker exec authentik-postgresql pg_restore -U authentik -d authentik /path/to/wherever/mydb.tar
Done!
Vaultwarden
Install Vaultwarden, a self-hosted Bitwarden-compatible password manager to replace Google or Apple password managers across all your devices.
Arcane
Install Arcane, a modern Docker and Compose management web UI, as a more advanced alternative to Dockge with multi-host support and OIDC login.