
Speedtest Tracker
Speedtest Tracker is a container that allows you to schedule regular speed tests in order to log your server's internet connection status.
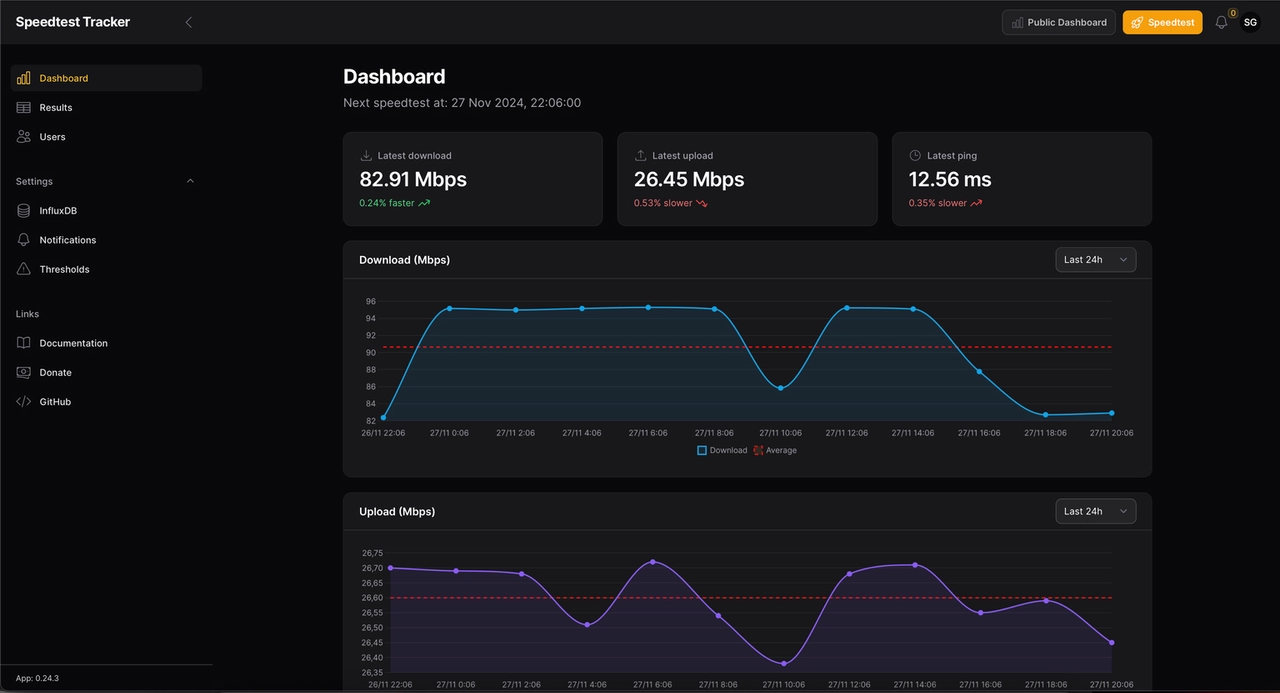
Installation
- /
- srv
- docker
- speedtest-tracker
- compose.yaml
- .env
- data
- config
- speedtest-tracker
- docker
- srv
Generate an app key
In a terminal, generate a key using the following command:
echo -n 'base64:'; openssl rand -base64 32;
Take note of the key.
Deploy the stack
Open Dockge, click on compose, name the stack speedtest-tracker, then paste the following:
---
services:
    speedtest-tracker:
        image: lscr.io/linuxserver/speedtest-tracker:latest
        restart: unless-stopped
        container_name: speedtest-tracker
        ports:
            - ${PORT}:80
        environment:
            - PUID=${PUID}
            - PGID=${PGID}
            - TZ=Europe/Paris
            - APP_KEY=${API_KEY}
            - DB_CONNECTION=sqlite
            - SPEEDTEST_SCHEDULE=${SCHEDULE}
        volumes:
            - /srv/docker/speedtest-tracker/data/config:/config
Set your environment variables
Find your PUID and PGID by running the following command:
id yourusername
In the .env file, set the variable API_KEY with the key you generated and add a cron-style test schedule, as well as your PUID and PGID, for example:
SCHEDULE=15 */6 * * * # every 6 hours
API_KEY=base64:zihejehkj8_nzhY/OjeieR= # your key
PUID=1000
PGID=1000
PORT=3225 # port to access the web UI
Deploy the container and go to http://yourserverip:3225. Log in with the account [email protected] and the password password. Don’t forget to change your ID and password once logged in!
Done!
Exposing Speedtest Tracker with SWAG
We assume that you've already created a subdomain like
speedtest.yourdomain.com in your DNS zone with a CNAME pointing to yourdomain.com, and unless you’re using Cloudflare Zero Trust, you've also forwarded port 443 from your router to port 443 of your server in your NAT rules.Now we want to expose Speedtest Tracker to the internet so you can access it remotely. We assume you've set up the DNS CNAME for speedtest.yourdomain.com pointing to yourdomain.com.
Create the subdomain.conf file
Open the speedtest.subdomain.conf file:
sudo nano /srv/docker/swag/config/nginx/proxy-confs/speedtest.subdomain.conf
Configure it like this:
## Version 2023/12/19

server {
    listen 443 ssl;
    listen [::]:443 ssl;

    server_name speedtest.*;

    include /config/nginx/ssl.conf;

    client_max_body_size 0;

    #if ($lan-ip = yes) { set $geo-whitelist yes; }
    #if ($geo-whitelist = no) { return 404; }
    if ($geo-blacklist = no) { return 404; }

    # Authentication options (uncomment as needed)
    #include /config/nginx/ldap-server.conf;
    #include /config/nginx/authelia-server.conf;
    #include /config/nginx/authentik-server.conf;

    location / {
        # Basic auth
        #auth_basic "Restricted";
        #auth_basic_user_file /config/nginx/.htpasswd;

        # Per-location authentication
        #include /config/nginx/ldap-location.conf;
        #include /config/nginx/authelia-location.conf;
        #include /config/nginx/authentik-location.conf;

        include /config/nginx/proxy.conf;
        include /config/nginx/resolver.conf;

        set $upstream_app speedtest-tracker;
        set $upstream_port 3225;
        set $upstream_proto http;
        proxy_pass $upstream_proto://$upstream_app:$upstream_port;
    }
}
Save and exit. The configuration will update in a few seconds.
Add Speedtest Tracker's network to SWAG
compose.yaml.Go to Dockge, and edit SWAG’s compose to include Speedtest Tracker’s network:
---
services:
  swag:
    container_name: # ...
    # ...
    networks:
      # ...
      - speedtest-tracker

networks:
  # ...
  speedtest-tracker:
    name: speedtest-tracker_default
    external: true
Restart the stack by clicking "Deploy" and wait for SWAG to be fully up.
speedtest-tracker_default. You can verify the connection by visiting SWAG’s dashboard at http://yourserverip:81.Done!
Wait a moment, then visit https://speedtest.yourdomain.com in your browser. You should be redirected to Speedtest Tracker. You can check service status via the dashboard (http://yourserverip:81 from the local network).
Protecting Speedtest Tracker with TinyAuth
Add TinyAuth's forward-auth check directly to speedtest.subdomain.conf, the same way as the TinyAuth guide:
## Version 2023/12/19

server {
    listen 443 ssl;
    listen [::]:443 ssl;

    server_name speedtest.*;

    include /config/nginx/ssl.conf;

    client_max_body_size 0;

    #if ($lan-ip = yes) { set $geo-whitelist yes; }
    #if ($geo-whitelist = no) { return 404; }
    if ($geo-blacklist = no) { return 404; }

    # Authentication options (uncomment as needed)
    #include /config/nginx/ldap-server.conf;
    #include /config/nginx/authelia-server.conf;
    #include /config/nginx/authentik-server.conf;

    location /tinyauth {
        internal;
        proxy_pass http://tinyauth:3000/api/auth/nginx;
        proxy_pass_request_body off;
        proxy_set_header Content-Length "";
        proxy_set_header X-Forwarded-Proto $scheme;
        proxy_set_header X-Forwarded-Host $http_host;
        proxy_set_header X-Forwarded-Uri $request_uri;
    }

    location @tinyauth_login {
        return 302 https://tinyauth.mydomain.com/login?redirect_uri=$scheme://$http_host$request_uri;
    }

    location / {
        auth_request /tinyauth;
        error_page 401 = @tinyauth_login;

        # Basic auth
        #auth_basic "Restricted";
        #auth_basic_user_file /config/nginx/.htpasswd;

        # Per-location authentication
        #include /config/nginx/ldap-location.conf;
        #include /config/nginx/authelia-location.conf;
        #include /config/nginx/authentik-location.conf;

        include /config/nginx/proxy.conf;
        include /config/nginx/resolver.conf;

        set $upstream_app speedtest-tracker;
        set $upstream_port 3225;
        set $upstream_proto http;
        proxy_pass $upstream_proto://$upstream_app:$upstream_port;
    }
}
location /tinyauth block runs inside SWAG's own container, so SWAG needs to be on TinyAuth's Docker network to reach it by name (tinyauth here). This should already be set up from exposing TinyAuth itself. If you run into an error, double-check SWAG's compose file still has that network attached.speedtest.subdomain.conf and uncommentinginclude /config/nginx/authentik-server.conf; and include /config/nginx/authentik-location.conf;.Don’t forget to create an application and provider in Authentik.