
Backrest
Let's be honest for a second: "backup strategy" for most homelabbers means copying a few folders to a USB stick that one time in 2019, then hoping for the best. Backrest is here to fix that, without making you learn a scary command-line tool first.
Under the hood, Backrest is a clean web interface on top of restic, a battle-tested, open-source backup engine. Restic does the actual work (encrypting, deduplicating, and shipping your data wherever you tell it to); Backrest gives you buttons and forms instead of a wall of flags to memorize.
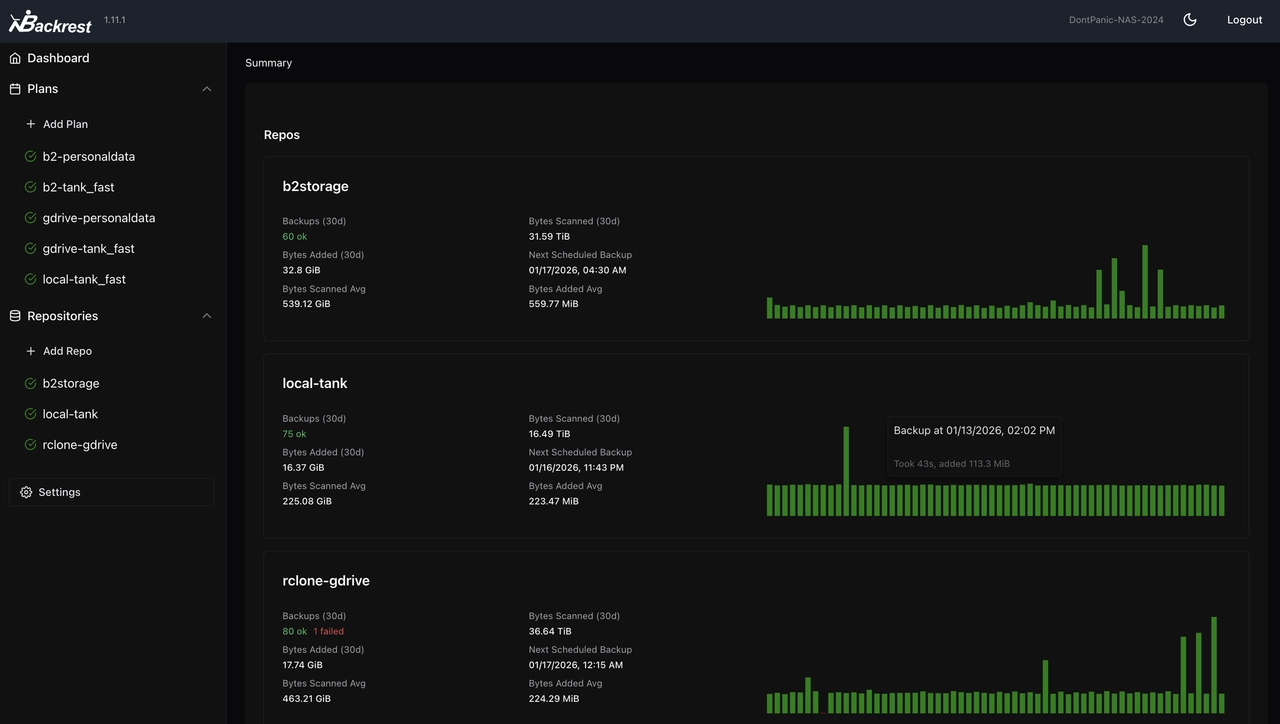
The 3-2-1 rule, or why one backup is not a backup
Before installing anything, let's talk about the rule that actually matters here, because a backup done wrong gives you false confidence, which is worse than no backup at all.
The 3-2-1 rule says:
- 3 copies of your data: the original, plus at least two backups.
- 2 different types of storage: not two copies sitting on the same disk, or on two disks in the same machine.
- 1 copy offsite: physically somewhere else, not in the same room, house, or building as the original.
Each number closes a specific failure scenario:
- Only 1 backup? A single mistake (a bad
rm -rf, a botched restore, a corrupted file silently copied over the good one) can take out your only safety net at the same time as the original. - Backups on the same type of storage (say, a second internal drive in the same server)? A power surge, a firmware bug, or a cheap PSU dying can very well take out every disk in the box at once.
- No offsite copy? Fire, flood, theft, or "I unplugged the wrong power strip" don't care how many drives you have, if they're all in the same room.
This is also exactly why RAID is not a backup: RAID keeps a service running when a disk dies, it does nothing against ransomware encrypting every file it can reach, a fat-fingered delete, or your house catching fire. Backrest, pointed at a destination outside your server, is what actually covers those cases.
What Backrest actually backs up, and where
Two concepts to know before clicking around:
- A repository is the destination: an encrypted, deduplicated storage location. This is your "2" and your "1" from the rule above, an external disk, another server, or cloud storage.
- A plan is the rule you define: which folders to back up, into which repository, on what schedule, and how many old snapshots to keep around.
You can have several plans backing up to several repositories at once, which is exactly how you'd build a real 3-2-1 setup: one plan to a local repository for quick restores, another plan to an offsite repository for the "my house is on fire" scenario.
Installation
- /
- srv
- docker
- backrest
- data
- config
- cache
- compose.yaml
- backrest
- docker
- srv
Deploy the stack
Open Dockge, click compose, name the stack backrest, and paste the following:
---
services:
  backrest:
    image: garethgeorge/backrest:latest
    container_name: backrest
    restart: unless-stopped
    ports:
      - 9898:9898
    volumes:
      - ./data:/data
      - ./config:/config
      - ./cache:/cache
      # Whatever you want Backrest to be able to back up has to be
      # mounted here too: this stack only sees what it's given.
      - /srv/docker:/userdata/docker:ro
      - /etc:/userdata/etc:ro
      - /home:/userdata/home:ro
    environment:
      - BACKREST_DATA=/data
      - BACKREST_CONFIG=/config/config.json
      - XDG_CACHE_HOME=/cache
      - TZ=Europe/Paris
The /srv/docker, /etc and /home lines above cover what's actually worth an off-site backup on a homelab server, per folders and partitions: /srv/docker holds every stack's config and data (databases, uploaded files, Vaultwarden's vault, Pocket ID's users, and so on), /etc holds your system configuration (the SSH hardening from the installation guide, your SWAG .subdomain.conf files, systemd units), and /home holds your own scripts and notes. All three are mounted read-only, a backup tool has no business writing to what it's backing up.
What's usually not worth it: a big media library or a torrent download folder sitting on a separate data disk. It's often huge, replaceable, and rarely worth paying for cloud storage or SSH bandwidth to protect.
services:
  backrest:
    #...
    labels:
      - com.centurylinklabs.watchtower.enable=true
Deploy the container, then open http://yourserverip:9898. The first visit asks you to set an admin username and password: do it immediately, Backrest has no account by default and the setup screen is wide open until you do.
Done!
Creating your first repository
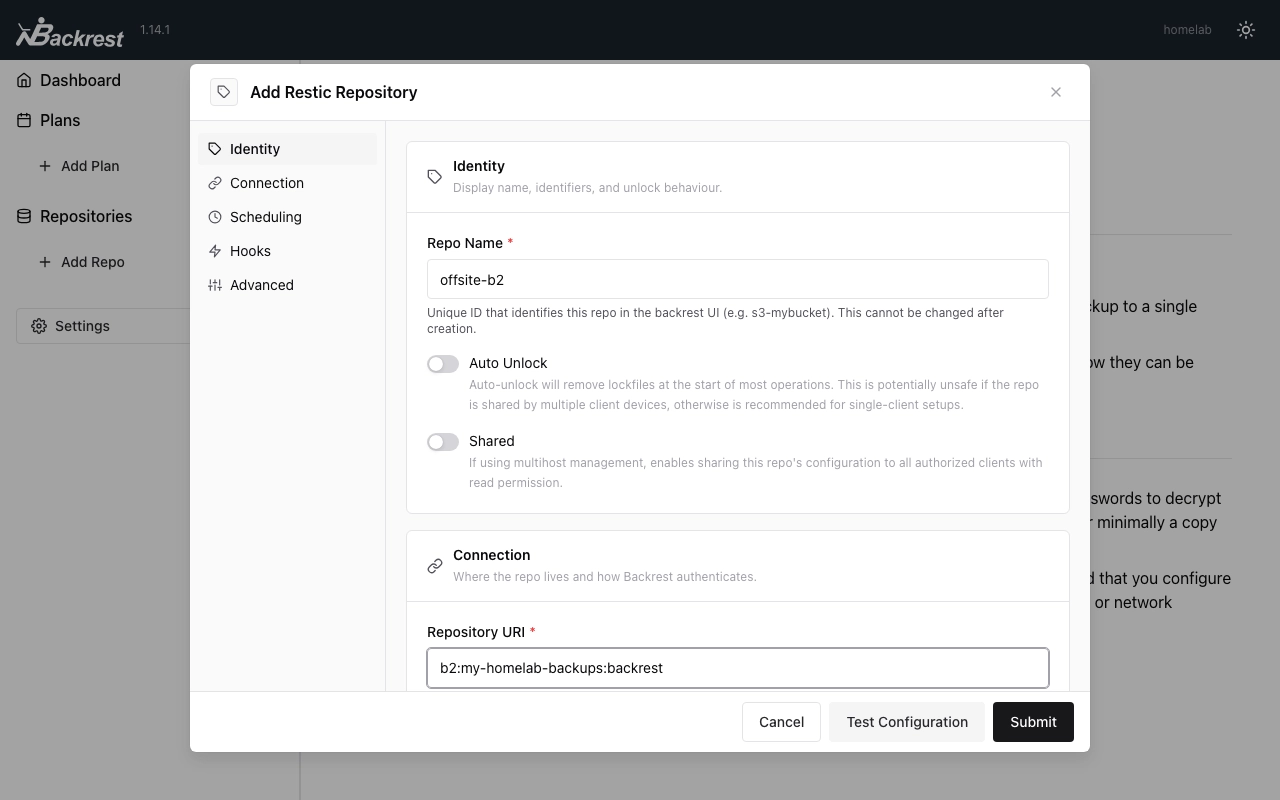
In Backrest, go to Add Repo. The form is split into a few sections, here's what each field actually does:
- Repo Name: whatever helps you recognize it later,
usb-keyoroffsite-vpsfor instance. You can't rename it afterwards, so pick something you won't regret. - Auto Unlock: leave this off unless you understand what it does. Restic locks a repository while it's working on it, so a second process doesn't corrupt things by writing at the same time. Auto Unlock removes that lock automatically on startup, which is convenient if Backrest crashed mid-backup and left a stale lock behind, but genuinely unsafe if two machines ever write to the same repository at once. For the single-server homelab setup this article covers, it's a minor convenience; leave it off if in doubt.
- Shared: only relevant to Backrest's multihost feature (several of your machines managing the same repo config). Ignore it for a single server.
- Repository URI: where the data actually lives. This is the field that changes for every destination below.
- Password: the encryption password for this repository, click Generate for a strong random one. Save it somewhere outside this server, a password manager, a note on your phone, anywhere but a text file sitting next to the backups it protects. Lose it, and every single backup becomes an expensive pile of unreadable noise, no exceptions, not even for the developers of restic.
- Env Vars: where you'll paste credentials for destinations that need them (S3 and B2 below). Local disks and SFTP don't need any.
Backing up to a local disk or USB key
The simplest possible offsite copy is a drive you physically move somewhere else after each backup, or a second machine's disk reached over the network. Either way, from Backrest's point of view it's just a folder, so the setup is identical: plug in the drive (or mount the remote share) on the host, add it to the compose file's volumes the same way you did for /srv/docker above, then in the Repository URI field, use the path as it appears inside the container:
/userdata/backup-drive
That's it, no credentials, no Env Vars. This is the fastest repository to restore from too, since there's no network round-trip involved, which makes it a great pick for your "quick recovery" copy, paired with a proper offsite one below for the "my house is on fire" scenario.
Backing up to another server
No cloud account, no problem: if you have SSH access to another machine, a friend's server, a cheap VPS, a Raspberry Pi at a relative's house, that's a perfectly valid offsite repository, and it costs whatever that machine already costs you.
First, make sure this server can SSH into the other one without typing a password every time:
ssh-keygen -t ed25519 -f /srv/docker/backrest/config/id_ed25519 -N ""
ssh-copy-id -i /srv/docker/backrest/config/id_ed25519.pub youruser@theotherserver
Mount that key into the container by adding it to the compose file's volumes:
    volumes:
      # ...
      - ./config/id_ed25519:/root/.ssh/id_ed25519:ro
Redeploy the stack, then in Backrest use:
sftp:youruser@theotherserver:/path/to/backups
/path/to/backups above) has to already exist on the other server, and that user needs write access to it. SSH there once by hand first (ssh youruser@theotherserver) to confirm the connection works and accept the host key, Backrest running inside a container won't get the interactive prompt for that.Advanced: cloud object storage
A local drive or a friend's spare server covers the 3-2-1 rule perfectly well, and costs nothing beyond what you already own. Cloud object storage is the other classic option, worth it once you want an offsite copy that doesn't depend on anyone's spare hardware staying online, at the cost of a few cents to a few euros a month depending on how much you back up.
Backblaze B2
Backblaze B2 is object storage built with exactly this use case in mind, and it's usually the cheapest option for the "write often, read rarely" pattern a backup is.
Create a bucket in your Backblaze account, then generate an application key scoped to it. In Backrest, use:
b2:your-bucket-name:backrest
With the following Env Vars:
| Variable | Value |
|---|---|
B2_ACCOUNT_ID | The application key ID |
B2_ACCOUNT_KEY | The application key itself |
S3-compatible storage
S3 isn't just an Amazon thing, it's a storage protocol that most cloud providers speak (OVH, Scaleway, MinIO if you self-host your own, and plenty of others), which makes it a solid, portable choice if you'd rather not depend on one specific provider.
Create a bucket with your provider of choice, then in Backrest's Repository URI field, use:
s3:https://s3.your-provider.com/your-bucket-name/backrest
For actual AWS S3, drop the custom endpoint:
s3:s3.amazonaws.com/your-bucket-name/backrest
With the following Env Vars:
| Variable | Value |
|---|---|
AWS_ACCESS_KEY_ID | The access key from your provider |
AWS_SECRET_ACCESS_KEY | The secret key from your provider |
Repository maintenance (optional, but worth setting up once)
Back in the Scheduling tab, three policies keep a repository healthy over time. None of them are required to start backing up, restic works fine without ever touching them, but they're worth understanding once your repository has been running for a while:
- Prune Policy: deletes data that's no longer referenced by any snapshot (because old snapshots holding it were forgotten, see the retention policy in the next section). This is the only operation that actually frees up space on your storage. It's slow and reads a lot of data, so schedule it rarely, once a month is Backrest's own suggestion. Max Unused After Prune controls how thorough it is: a higher percentage leaves more unused data behind but finishes faster and copies less.
- Check Policy: verifies your repository isn't silently corrupted. Read Data % controls how much of the actual backed-up data gets re-read and checksummed, not just the repository's internal structure. 100% means a full re-read of everything, which uses real bandwidth and time; a smaller percentage checks a random sample instead. Once a month is, again, a reasonable default.
- Forget Policy: an optional repository-wide retention rule, applied across every plan writing to this repository instead of per-plan. Leave this disabled unless you specifically want one retention policy shared by multiple plans, it disables each plan's own retention policy the moment you turn it on.
Every one of these has a Schedule Type: Disabled, a plain Interval in hours or days, or a Cron Expression for anything more specific, plus a Reference Clock (your server's local time, UTC, or relative to the last time it ran) to anchor that schedule against.
Creating a backup plan
Back in Backrest, go to Add Plan. This form covers what to back up and when, as opposed to the repository form above, which only covers where:
- Plan Name: same rule as the repo name, pick something clear, you can't change it later.
- Repository: the one you just created above.
- Paths: click Add to add a row, then type in the container-side path for whatever you mounted above, it's a plain text field, but it autocompletes real paths from the container's filesystem as you type, handy to confirm a mount actually landed where you think.
/userdata/dockerfor your stacks,/userdata/etcfor your system config,/userdata/homefor your own files. Click Add again for each additional folder, the small-button removes a row you don't need. - Excludes and Excludes (Case Insensitive): patterns to skip within those paths, handy for cache folders or anything genuinely disposable that would otherwise bloat every snapshot for no reason.
- Schedule Type: same three choices as the repository's own schedules above,
Disabled, anInterval, or aCron Expression. A nightly cron like0 3 * * *(every day at 3 AM) is a reasonable default for a homelab. - Retention Policy: how many snapshots to keep, and for how long. By Time Period lets you say "keep 7 daily, 4 weekly, 6 monthly" independently, which gives you plenty of restore points spread over time without the repository growing forever, since restic deduplicates unchanged data between snapshots anyway. By Count instead just keeps the last N snapshots regardless of age. Latest (Count) on top of either mode guarantees a minimum number of recent snapshots always survive, whatever the rest of the policy says.
- Advanced: Backup Flags let you pass extra options straight to the underlying
restic backupcommand for anything this form doesn't expose; Hooks run scripts or send notifications on backup events, the same mechanism as the repository's own Hooks tab, just scoped to this one plan instead of every plan using the repository.
That retention policy is your real defense against ransomware, by the way: if something starts encrypting your files at 2 AM, tonight's backup is compromised, but last week's snapshot isn't, and restic lets you restore from any of them.
Restoring a backup
A backup you've never tried restoring is a guess, not a plan, so it's worth doing once before you actually need it. Open the plan, click into a snapshot, expand Snapshot Browser down to whatever you need, then click the ... menu next to it and pick Restore to path.
Leave the path field empty and Backrest streams it straight to your browser's downloads instead, the simplest option for grabbing a single file. Type a path and Backrest writes the restored data inside the container at that location instead, and it pre-fills a scratch folder like /userdata-backrest-restore-<snapshot id>, deliberately not your original mount.
That default isn't an accident: /srv/docker, /etc and /home are mounted :ro, so restic can't write back into them, restoring straight into /userdata/docker fails with a read-only filesystem error. Restore to that suggested scratch path (or download instead), check what you got, then copy the files into their real place yourself with sudo cp -a, from the host, outside of Backrest entirely. It's one extra step, but it also means a restore can never silently clobber live data by accident, exactly the caution you want mid-incident.
And that's it, you now have an actual backup strategy instead of a folder called backup_final_v2_REAL.
Arcane
Install Arcane, a modern Docker and Compose management web UI, as a more advanced alternative to Dockge with multi-host support and OIDC login.
BTRFS Snapshots
Format Debian's root filesystem with BTRFS and use Snapper to instantly roll back a risky update or config change, as a local complement to Backrest's off-site 3-2-1 backups.